Bring your own carrier
Overview
Bring Your Own Carrier (BYOC) allows SignalWire users to retain their own carriers for connectivity instead of the vendors that we partner with. This allows you to use any carrier you want while still utilizing the powerful programmatic control for SIP from SignalWire!
This might be a good fit for you if:
- You like your current carrier but want to use our APIs to enhance your call flow
- You want international origination from a country we don't yet support
- The number cannot be ported into SignalWire
- You want to keep control of the number rather than port it to SignalWire
- You want to SIP trunk to/from a SIP Server (such as Kamailio)
Inbound BYOC
If you would like to do inbound BYOC (i.e. send your carrier traffic to SignalWire), you will need to create a domain application. Domain Apps allow you to send SIP traffic to a custom domain and use SignalWire APIs to manage the incoming request. You can do this under SIP -> Domain Apps -> Create a Domain App, or via the Domain Apps API.
For detailed instructions on how to create a domain application, please follow the SIP Domain Applications guide.
It's VERY important to whitelist the IPs that you want to allow through - if you do not select this option, anyone who has the URL could send traffic to your custom domain app.
Handling Inbound Calls
Using Compatibility API/XML
If you try directing traffic to your domain app without configuring it, SignalWire will not pick up the call. To have SignalWire pick up the call, so you can do something with it you will need to:
- Go to the settings page for the newly created Domain App, by clicking on the app name in the Domain Apps list.
- Set the HANDLE USING field to LaML WebHooks
- Set the WHEN A CALL COMES IN field to the URL of your XML Bin
- Ensure the XML bin is set up to provide instructions on what actions to perform when a call comes in.
To address both of the steps above, we will need to create an XML Bin. The bare minimum of instructions you must provide for SignalWire to pick up the call is an empty response:
Example cXML Bin
<?xml version="1.0" encoding="UTF-8"?>
<Response>
</Response>
This XML Bin example, with just an empty response, will "respond" to the call by picking it up. You'll probably want to do much more than this, such as dialing to another SIP endpoint, so we recommend learning more about the Verbs you can use.
To learn more about setting up XML bins, have a look at our guide on creating and using cXML applications.
Using SWML
If you are using SWML to handle incoming calls, you will need to:
- Go to the settings page for the newly created Domain App, by clicking on the app name in the Domain Apps list.
- Set the HANDLE USING field to SWML Script
- Set the WHEN A CALL COMES IN field to the URL of your SWML script
- Ensure the SWML script is set up to provide instructions on what actions to perform when a call comes in.
To address both of the steps above, we will need to create an SWML script.
Example SWML Script
The following is a simple example of an SWML script that answers the call and plays a TTS message:
- YAML
- JSON
version: 1.0.0
sections:
  main:
    - play:
        url: 'say: Hello, welcome to SignalWire!'
{
  "version": "1.0.0",
  "sections": {
    "main": [
      {
        "play": {
          "url": "say: Hello, welcome to SignalWire!"
        }
      }
    ]
  }
}
Using Call-Flow Builder
If you are using a Call Flow to handle incoming calls, you will need to:
- Go to the settings page for the newly created Domain App, by clicking on the app name in the Domain Apps list.
- Set the HANDLE USING field to A Call Flow
- Set the WHEN A CALL COMES IN field to the Call Flow you want to use from the dropdown list.
- Ensure the Call Flow is set up to provide instructions on what actions to perform when a call comes in.
Example Call Flow
In the below example, we have a Call Flow that answers the call and plays a TTS message.
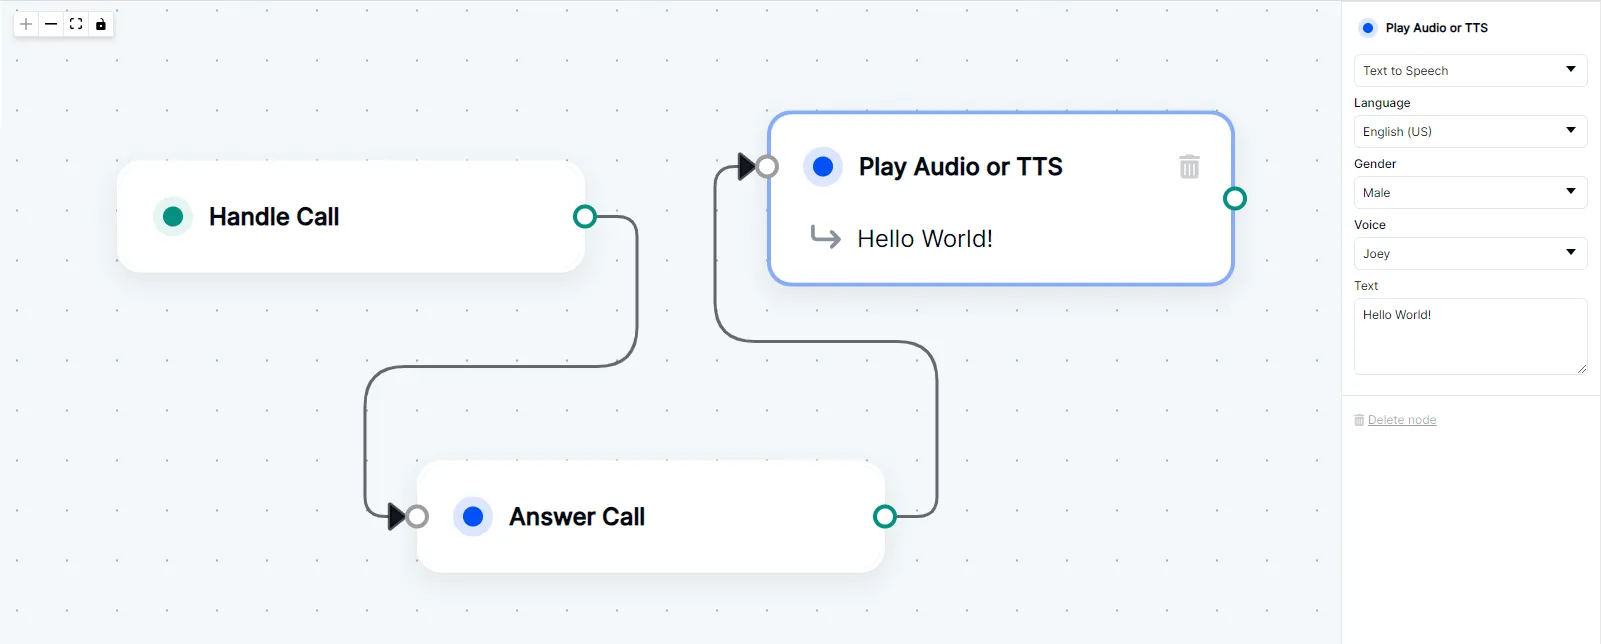
A Call Flow that answers the call and plays a TTS message
Using RELAY
To handle incoming calls using a RELAY Application, you will need to:
- Go to the settings page for the newly created Domain App, by clicking on the app name in the Domain Apps list.
- Set the HANDLE USING field to RELAY Application
- Set a context (think of it as a traffic label) in the WHEN A CALL COMES IN field. Let's use an
officecontext as an example; - Run code listening for calls on that
officecontext and then do something with them.
- RELAY V3
- RELAY V4
RELAY V3 Example
import { Voice } from "@signalwire/realtime-api";

const client = new Voice.Client({
  project: "<project-id>",
  token: "<api-token>",
  contexts: ["office"],
});

client.on("call.received", async (call) => {
  console.log("Got call", call.from, call.to);

  try {
    await call.answer();
    console.log("Inbound call answered");

    await call.playTTS({ text: "Hello! This is a test call." });
  } catch (error) {
    console.error("Error answering inbound call", error);
  }
});
In this example we're creating a Client and tying it to the office context.
Then, we tell it to listen for call.received events, and when a new call comes
in we answer it and say "Hello! This is a test call." to the caller.
RELAY V4 Example
import { SignalWire } from "@signalwire/realtime-api";

const client = await SignalWire({
  project: "your-project-id",
  token: "your-api-token",
  topics: ["office"],
});

const voiceClient = client.voice;

await voiceClient.listen({
  topics: ["office"],
  onCallReceived: async (call) => {
    console.log("Got call", call.from, call.to);

    try {
      await call.answer();
      console.log("Inbound call answered");

      await call.playTTS({ text: "Hello! This is a test call." });
    } catch (error) {
      console.error("Error answering inbound call", error);
    }
  },
});
In this example we're creating a Client and tying it to the office topic.
Then, we tell it to listen for call.received events, and when a new call comes
in we answer it and say "Hello! This is a test call." to the caller.
To learn more about what you can do with RELAY, have a look at our RELAY Realtime SDK documentation.
Outbound BYOC
If you are using BYOC to do outbound calls from SignalWire, you will need a SIP URL from your carrier that we can use to route calls to the right SIP trunk. Once you have that, you can create a call using the Compatibility API or Realtime SDK using the SIP URL, SIP username, and SIP password. Let's look at some examples so you can see what we're talking about!
Outbound Call Examples
Using Calling API/SWML
Calling API
To create an outbound call using the Calling API with curl, you can use the Create a Call endpoint with the following format:
curl -L 'https://<YOURSPACENAME>.signalwire.com/api/calling/calls' \
-H 'Content-Type: application/json' \
-H 'Accept: application/json' \
-H 'Authorization: Basic Base64-token-here' \
--data-raw '{
  "command": "dial",
  "params": {
    "url": "https://example.com/swml",
    "from": "sip:from-sip@example-112233445566.sip.signalwire.com",
    "to": "sip:from-sip@example-112233445567.sip.signalwire.com",
    "caller_id": "+1234567890",
    "fallback_url": "https://example.com/fallback"
  }
}'
In the params you can specify a url that points to an SWML script, or you can pass a swml key with the SWML script directly.
SWML
To create an outbound call using SWML, you can use the following format:
- YAML
- JSON
version: 1.0.0
sections:
  main:
    - connect:
        to: "sip:user@domain.com"
        headers:
          - name: "x-FROM_NUMBER"
            value: "%2B123456789"
{
  "version": "1.0.0",
  "sections": {
    "main": [
      {
        "connect": {
          "to": "sip:user@domain.com",
          "headers": [
            {
              "name": "x-FROM_NUMBER",
              "value": "%2B123456789"
            }
          ]
        }
      }
    ]
  }
}
Using Call-Flow Builder
To create an outbound call using a Call Flow, you can use the Forward to Phone node to dial out to a SIP endpoint:
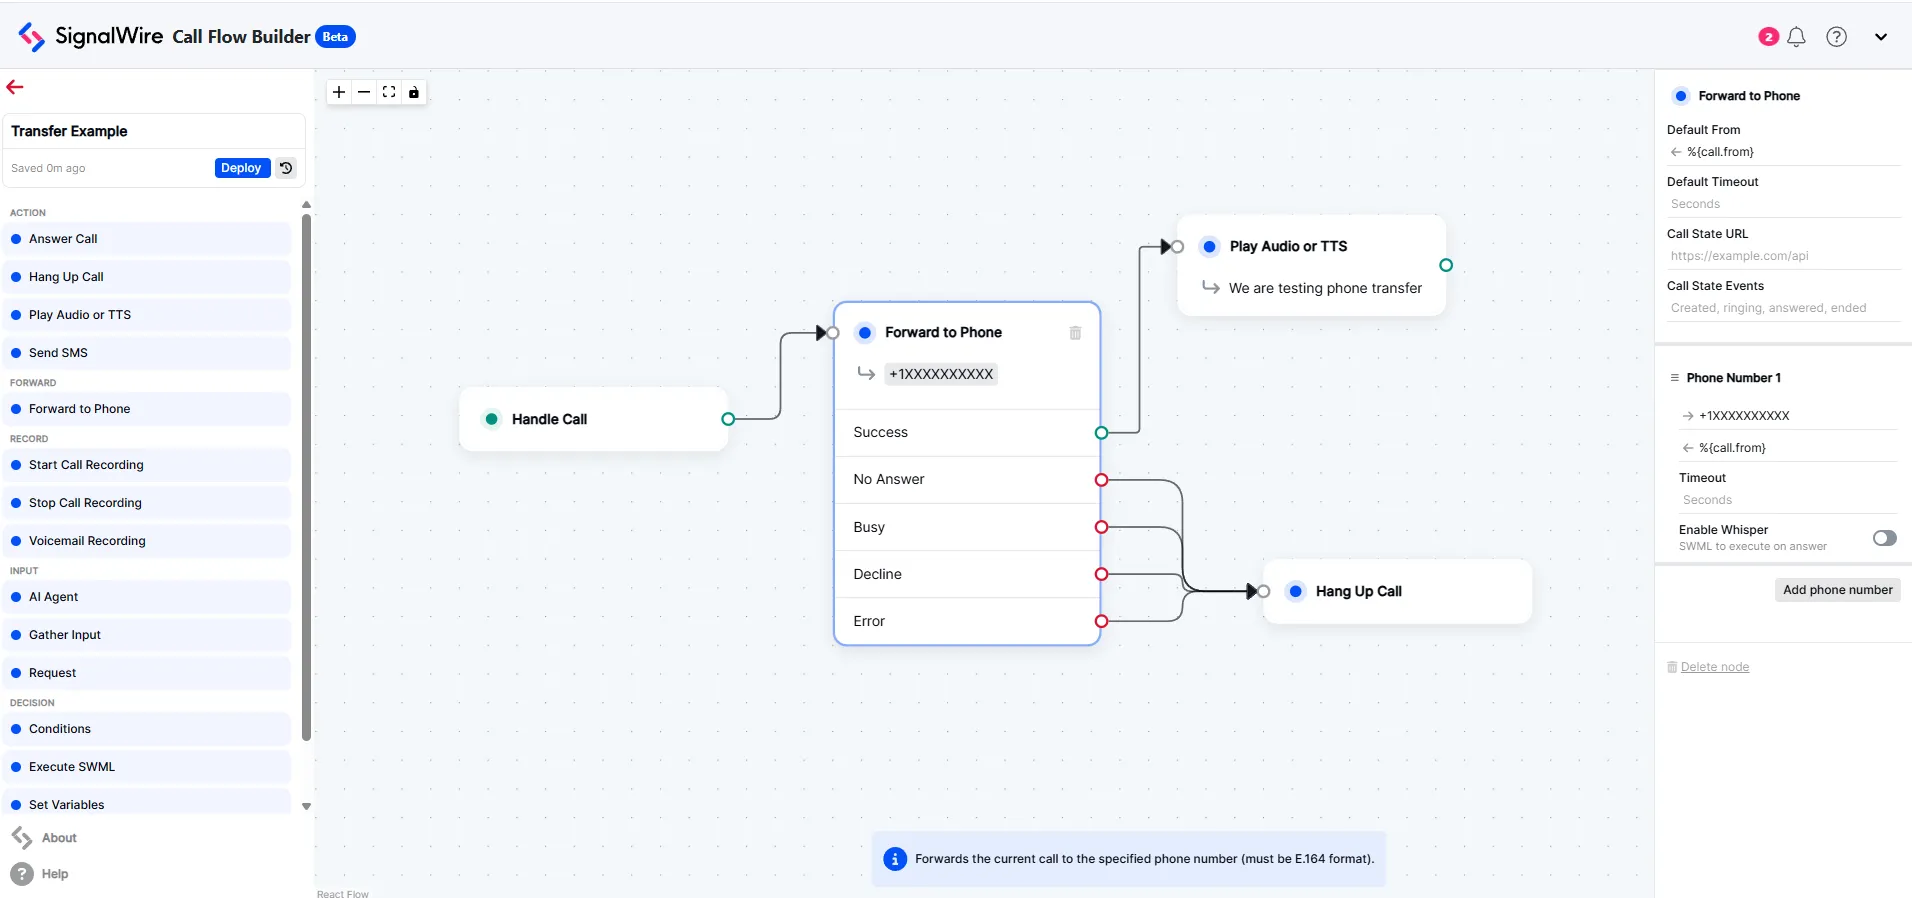
A Call Flow that forwards a call to a SIP endpoint
Using Compatibility API/cXML
cXML Bins
To start an outbound call using XML Bins you can use the Dial verb along with the SIP noun:
<?xml version="1.0" encoding="UTF-8"?>
<Response>
  <Dial
    callerId="+11111111111">
      <Sip
        username="YourUsername"
        password="YourPassword">
          sip:user@domain.com;transport=udp?header1=foo&header2=bar
      </Sip>
  </Dial>
</Response>
cURL
To create an outbound call that executes the instructions from a XML Bin we can use the following format for a cURL command:
curl https://<YOURSPACENAME>.signalwire.com/api/laml/2010-04-01/Accounts/<YOURPROJECTID>/Calls.json \
  -X POST \
  --data-urlencode "Url=YourXMLBinURL" \
  --data-urlencode "sip:YOUR SIP URL" \
  --data-urlencode "From=+15550011222" \
  --data-urlencode "SipAuthUsername=user" \
  --data-urlencode "SipAuthPassword=pass" \
  -u "YourProjectID:YourAuthToken"
Using RELAY
RELAY Realtime SDK
RELAY Realtime SDK is our most recent version of RELAY, and dialing out to a SIP endpoint is simpler than ever:
- RELAY V3
- RELAY V4
import { Voice } from "@signalwire/realtime-api";

const client = new Voice.Client({
  project: "<project-id>",
  token: "<api-token>",
  contexts: ["office"],
});

try {
  const call = await client.dialSip({
    from: "sip:xxx@yyy.zz",
    to: "sip:ppp@qqq.rr",
    timeout: 30,
  });

  // TODO: Add code to do something with the call object here
} catch (e) {
  console.log("Call not answered.");
}
import { SignalWire } from "@signalwire/realtime-api";

const client = await SignalWire({
  project: "<project-id>",
  token: "<api-token>",
  topics: ["office"],
});

try {
  const call = await voiceClient.dialSip({
    from: "sip:xxx@yyy.zz",
    to: "sip:ppp@qqq.rr",
    timeout: 30,
  });

  // TODO: Add code to do something with the call object here
} catch (e) {
  console.log("Call not answered.");
}
How to Get Started
If you are interested in BYOC and need additional assistance getting started, reach out to support@signalwire.com! One of our support technicians can make sure everything gets squared away so you can get up and running in no time.
Check out our guide on how to integrate with Thinq as your carrier!
Sign Up Here
If you would like to test this example out, create a SignalWire account and Space.
Please feel free to reach out to us on our Community Discord or create a Support ticket if you need guidance!