
Introduction to Call Flow Builder

SignalWire's Call Flow Builder is a no-code visual tool for call process creation and management. It features a simple drag-and-drop interface for creating complex call flows with multiple branches and decision points.

All elements of the call flow are represented as nodes in a tree structure. You can easily add, remove, and rearrange elements in the call flow using the visual interface.

A screenshot of a sample call flow created with Call Flow Builder, showing connections between nodes.
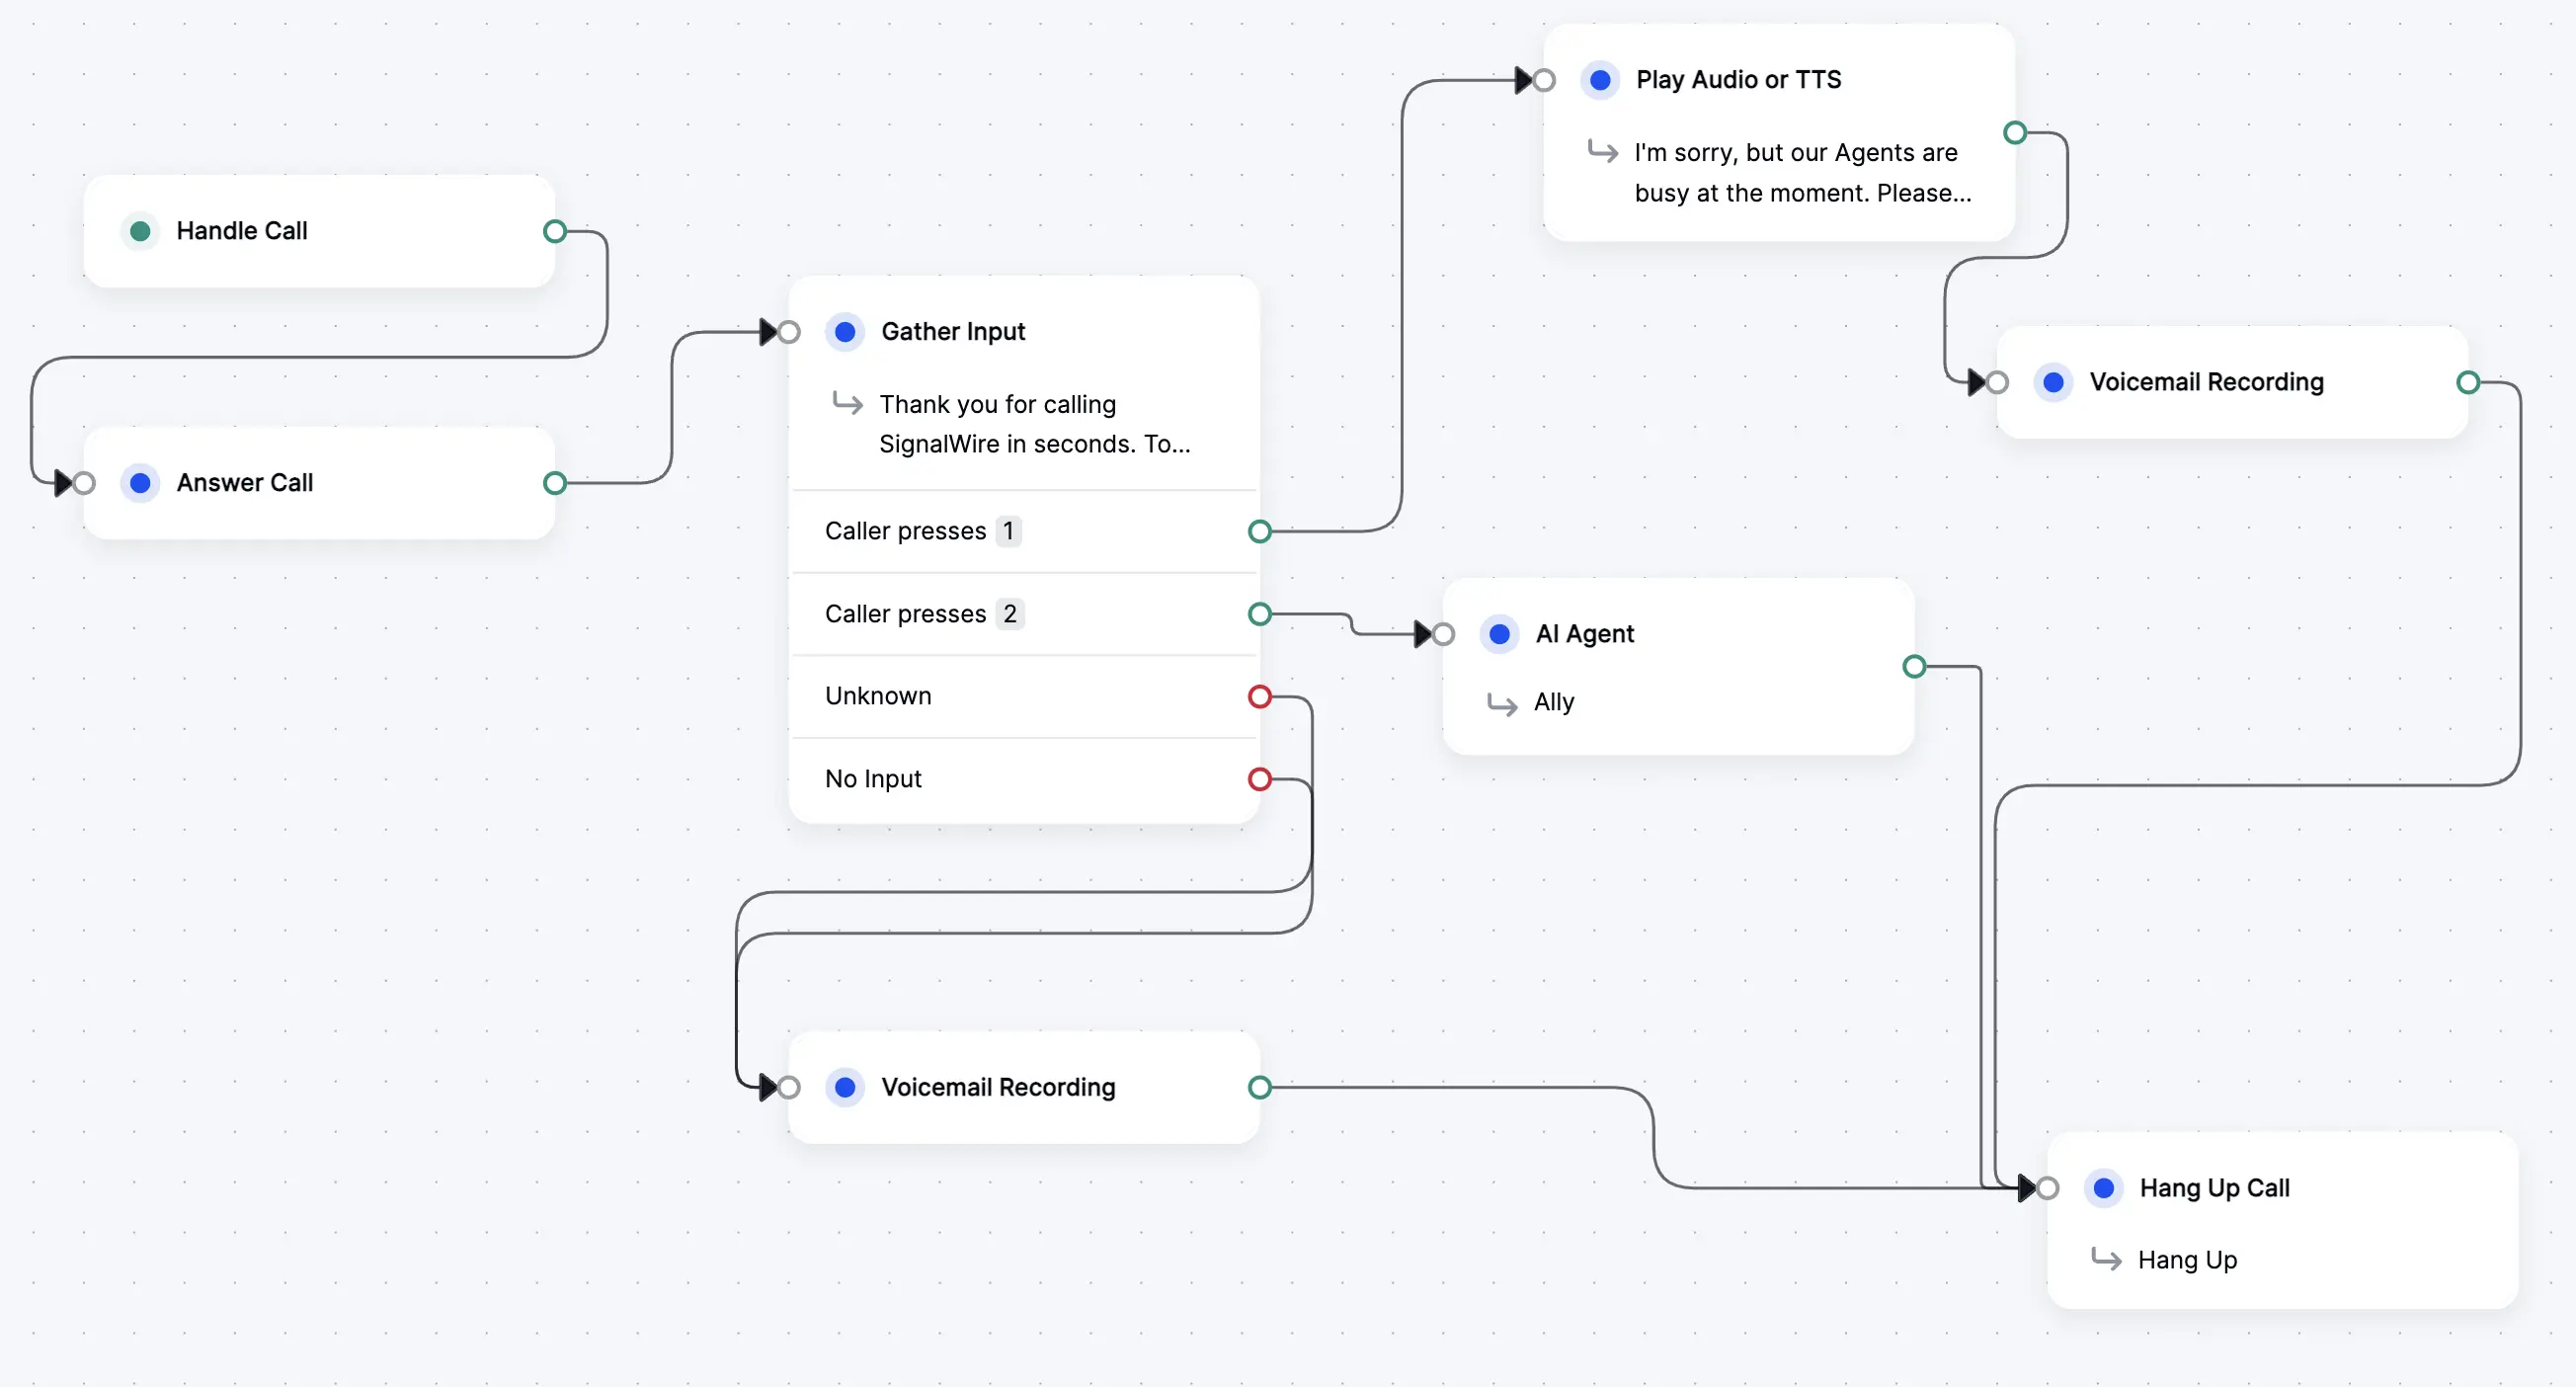
A sample Call Flow showcasing input-gathering, recording, AI Agent, and TTS features.

Add or remove any element from the call flow by dragging it into the desired location, and define links between them using the connection lines.

Extend each flow by integrating external APIs, or by using SignalWire Markup Language (SWML). Call Flow Builder also offers built-in versioning to streamline testing multiple configurations.

tip

Under the hood, Call Flow Builder generates valid SWML (SignalWire Markup Language), meaning all the power of SWML is available whenever you need more control over your call flows.


Getting Started

To get started with the Call Flow Builder, you can head to the Call Flow Builder section in your SignalWire Dashboard.

Check out this brief demo to see how to add, configure, and connect nodes in Call Flow Builder.

Creating a New Call Flow

To create a new call flow, click on the Add New button in the Call Flow Builder section of the Dashboard. From here, you can give your call flow a name, and then click Save to create the new call flow. After creating the call flow, the Call Flow will show up in the list of call flows in the Dashboard.

Creating a new Call Flow in the SignalWire Dashboard.
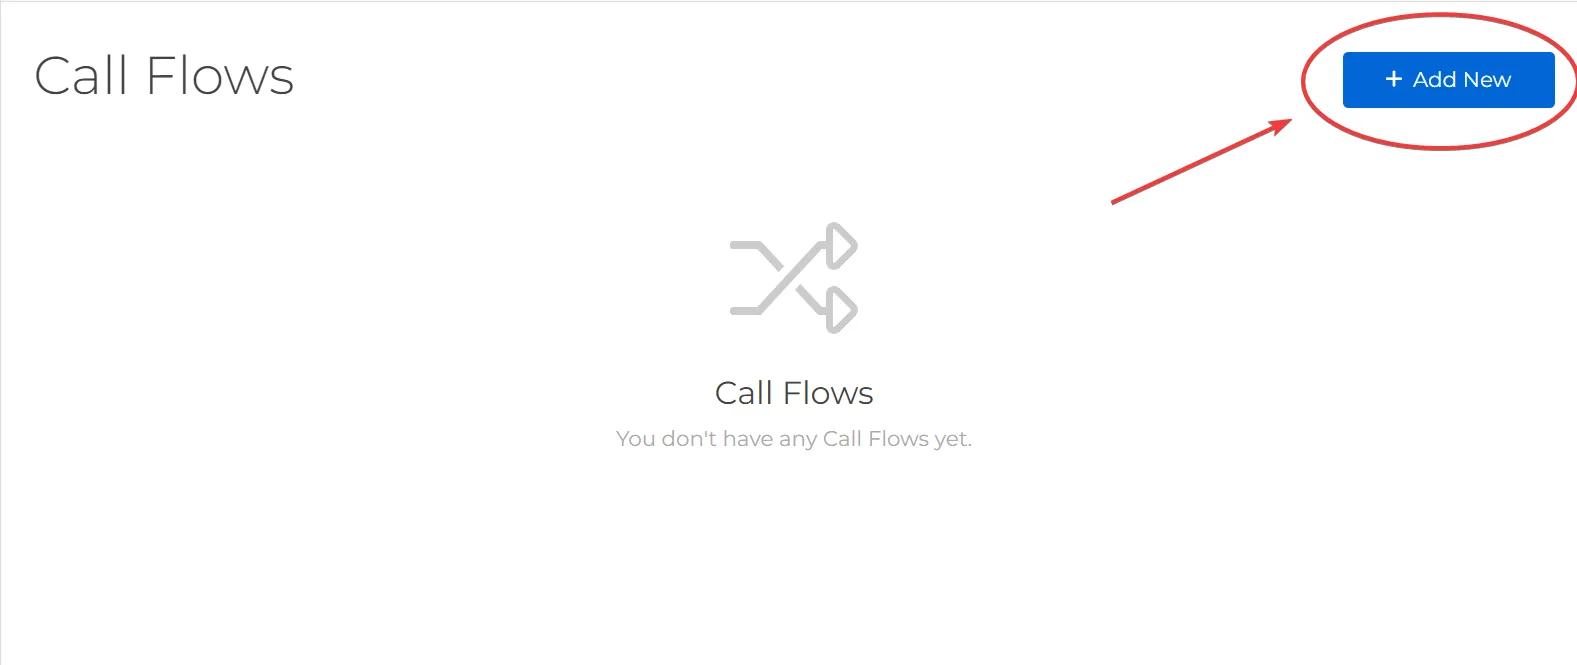
Creating a new Call Flow.

Building a Call Flow

Once a Call Flow has been created, you can click on the More Options button to open the Call Flow Builder interface. From here, click on the Edit option to open the Call Flow Builder page.

Clicking on the edit option for a Call Flow.
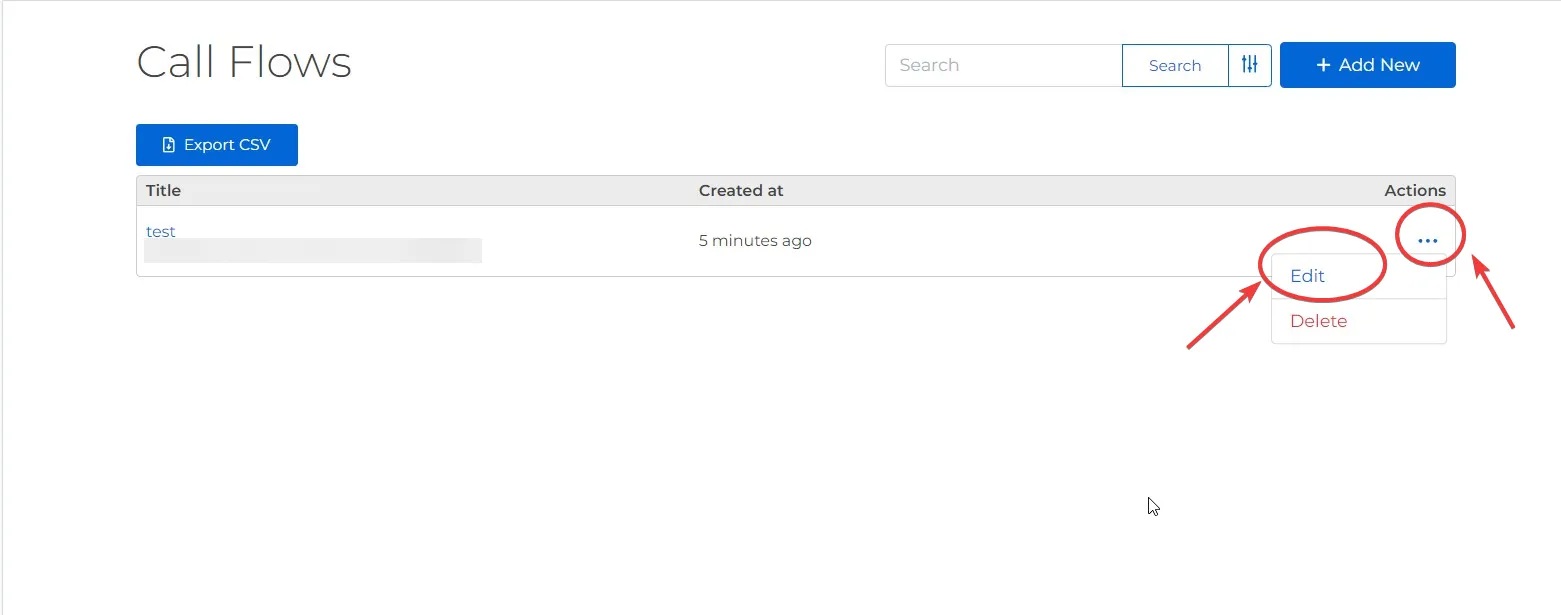
Editing a Call Flow.
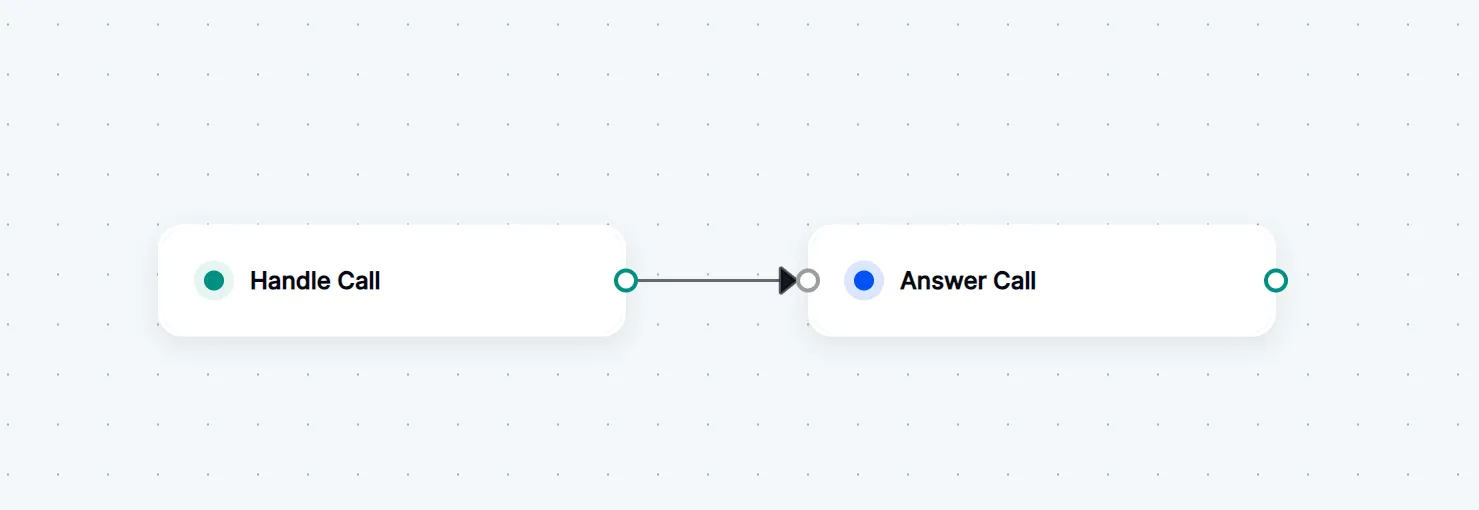
Adding Nodes

When you first open a new Call Flow, you will see a canvas with a single node: the Handle Call node. This node is the entry point for incoming calls and serves as the start of all Call Flows. From here the Call Flow Builder interface allows you to create and manage call flow nodes using a visual drag-and-drop interface.

Every node has a single input connector on the left, and one or more output connectors on the right. These connectors allow you to connect nodes together to create flows and logical relationships.

Add nodes to the Call Flow by dragging them from the left-hand panel and dropping them onto the canvas. Starting with the Handle Call node, you can connect a node by clicking and dragging from the output connector (right side of node) to the input connector (left side of node) of another node. You will see an arrow connecting the two nodes, indicating that they are connected.

Adding a new node to a Call Flow.

Configuring Nodes

Some nodes have configuration options that can be set by clicking on the node. This will open a configuration panel where you can set the options for that node. For example, the Play Audio or TTS node allows you to select an audio file or enter text to be played to the caller.

Configuring a node in a Call Flow.

Deleting Nodes

To delete a node, you can click on the delete icon located on the right side of the node. Additionally, you can delete a node if they have configuration options open by clicking the Delete node button in the configuration panel.

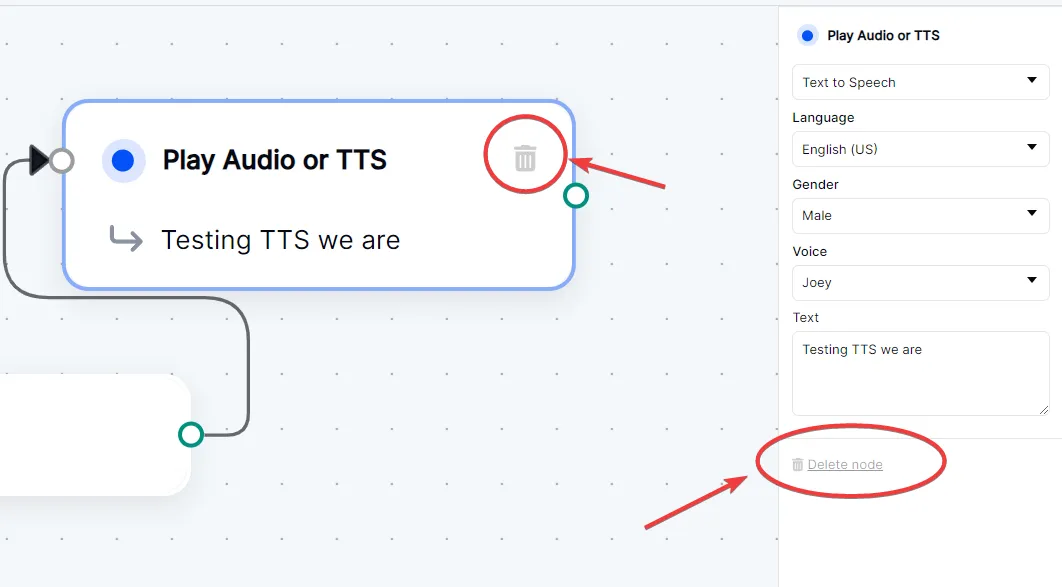
Deleting a node from a Call Flow.

Nodes

A call flow consists of a series of nodes, which represent different actions that can be taken during a call. Each node has a specific purpose, and you can connect nodes together to create a flow that guides the caller through the call process.

Starting Node

Starting nodes are the first nodes in a call flow and are used to handle incoming calls.

Node TypeDescription
Handle CallHandles an incoming call. Starting point in the Call Flow

Action Nodes

Action nodes perform specific actions during a Call Flow, such as playing audio, answering/hanging up a call, or sending an SMS.

Node TypeDescription
Answer CallAnswers an incoming call.
Hang Up CallHangs up the call.
Play Audio or TTSPlays an audio file or text-to-speech message to the caller.
Send SMSSends an SMS message to the caller.

Forward Nodes

Forward nodes transfer the call to another number.

Node TypeDescription
Forward to PhoneForwards the call to a phone number.

Record Nodes

Record nodes record the caller's/callee's voice/voicemail.

Node TypeDescription
Start Call RecordingStarts recording the call.
Stop Call RecordingStops recording the call.
Voicemail RecordingRecords a voicemail.

Input Nodes

Input nodes collect input or http requests from the caller.

Node TypeDescription
AI AgentConnects the call to an AI agent.
Gather InputCollects input from the caller.
RequestSends an HTTP request.

Decision Nodes

Decision nodes make decisions based on the conditions specified.

Node TypeDescription
ConditionsEvaluates conditions and branches the call flow accordingly.
Execute SWMLExecutes SWML code.
Set VariablesSwitches variables based on conditions.
Unset VariablesUnsets a variable.

Using Variables

Variables allow you to create a dynamic Call Flow that responds to user input and other outside information.

While the Set Variables node allows you to manually create your own variables at any time, you can also use variables from Request nodes or even get variables from the inbound call. All variables must be in the following format to signal to the Call Flow Builder that it should process a variable: %{<variable>}.

Inbound Call Variables

The following variables exist for all inbound calls. At this time, the direction is always inbound, but the other values are very useful and can be referenced throughout the whole Flow.

Variable NameDescription
%{call.from}The phone number of the caller.
%{call.to}The phone number the call was made to.
%{call.direction}The direction of the call.
%{call.call_id}The unique identifier for the call.
%{call.state}The state of the call.
%{call.type}The type of call.

Variable Example

Using a phone number as a variable in a Call Flow.
Pass the caller phone number using a variable.

Request Variables

Variables that you get from a Request node can be accessed using %{request_response.<object_field>}. For example, if we send a GET request to timeapi.io, the response we’ll receive will look like this:

{
"year": 2023,
"month": 7,
"day": 27,
"hour": 16,
"minute": 9,
"seconds": 9,
"milliSeconds": 640,
"dateTime": "2023-07-27T16:09:09.640945",
"date": "07/27/2023",
"time": "16:09",
"timeZone": "America/Chicago",
"dayOfWeek": "Thursday",
"dstActive": true
}

To reference the “hour”, “date” and “dayOfWeek” from this response as variables in the Call Flow, we would format the variables like this:

%{request_response.hour} %{request_response.date} %{request_response.dayOfWeek}

Please note that response values that are strings will need special formatting to be used with conditional expressions or JavaScript operators. Use the format %{vars.request_response.<object_field>'} to use the value of the string.

In the example above, the response parameter "dayOfWeek" has a string value of "Thursday". The following condition will only be met when the day of the week is Thursday:

%{vars.request_response.dayOfWeek == 'Thursday'}

You can also use slice() to remove everything from the string after the third character to give you a shortened day of the week (Fri, Sat, Mon):

Key: short_day Value: %{vars.request_response.dayOfWeek.slice(0,3)}

Variables with JavaScript Operators

You can use variables along with standard Javascript operators. This can be useful if you need to alter a variable or pass a condition that matches an expression.

For example, you can use the slice() method to remove everything from the %{call.from} variable except for the area code of an inbound caller. Within a Set Variables node, you can set the following:

Key: area_code

Value: %{call.from.slice(2,5)}

You can even combine this with a Conditions node as in the example below. Condition 1 uses the OR operator to check if the area code is 321 or 407.

If either of those is true, the call is forwarded to +15552223333. A second condition in the same node checks for a 419 area code and forwards the call to +15553334444.

Condition 1: %{area_code}==321||%{area_code}==407 Condition 2: %{area_code}==419

Using slice to alter a variable.
Use the slice() method to alter a variable.