Creating a Publicly Exposed Webhook with Pyngrok
What are we going to do?
We are going to respond to an incoming text message via a webhook that is hosted on our own server! SignalWire uses this webhook method to help connect the events of the numbers in your project, to the actions laid out on your local application.
The first step will be to declare the contents of our webhook, these are instructions on what steps to take once a message comes in.
Next, we need to turn this local webhook into a publically exposed address so that it can receive HTTP requests and be interpreted by SignalWire.
Lastly, we need to take this public address in the form of a URL and configure it to our SignalWire phone number.
Whenever a significant event occurs within your SignalWire project (such as a message coming in or a call changing status), SignalWire can send your application an HTTP request that gives an update on these events. Typically, in the form of a GET or POST request.
When SignalWire sends status information back to your server, we conveniently named these, Status Callbacks and they allow for many ways to enhance your applications in real-time.
If you enjoy creating cXML applications that are hosted on SignalWire servers and manually setting your phone number settings to associate your webhooks, then no worries. Some people enjoy taking the longer, scenic route. You can read more about the process HERE
But, if you would like to host your own webhooks, and automate the process of configuring your number's webhooks, then buckle in for this guide! There will be tunnels, flasks, and pythons. Oh my!
As we mentioned before, webhooks are user-defined HTTP callbacks. So, in order for our webhook to be executed, they must be able to accept and handle these HTTP requests. Regardless of your server-side programming language of choice, there are libraries available to transform your application and make this as seamless as possible. For this example, in python, we will be using Flask.
Full code example: Create Public Webhook and Configure SMS URL
import os
from pyngrok import ngrok
from flask import Flask, request
from signalwire.messaging_response import MessagingResponse
from signalwire.rest import Client as signalwire_client

# Input User Authentication into Client
ProjectID= "AAAAAAAA-BBBB-CCCC-DDDD-EEEEEEEEEEEE"
AuthToken= "PTXXXXXXXXXXXXXXXXXXXXXXXXXXXXXXXXXXXXXXXXXXXX"
SpaceURL = 'SPACE.signalwire.com'
sw_phone_number= '+1AAABBBCCCC'

client = signalwire_client(ProjectID, AuthToken , signalwire_space_url = SpaceURL)

# Initialize the Flask object
app = Flask(__name__)


# Define what we would like our application to do
@app.route("/sms_app", methods=['GET', 'POST'])
def sms_app():

    # Find the body of the incoming message and send out a response based based on that string
    body = request.values.get('Body', None)

    # Start our message response
    resp = MessagingResponse()

    # Determine the proper body to reply back to the sender
    # If anything besides 'y' or 'n' comes in as the body, the application will send out the standard prompt (listed underneath the else statement)
    if body == 'y':
        resp.message("Great! You will report to the Death Star for training tomorrow")
    elif body == 'n':
        resp.message("No problem, may the sith be with you")
    else:
        resp.message(f'Would you like the First Order to contact you about career opportunities around the galaxy?(y/n)')
    return str(resp)


# Set the ngrok URL as the webhook for our SW phone
def start_ngrok():
    # Set up a tunnel on port 5000 for our Flask object to interact locally
    url = ngrok.connect(5000).public_url
    print(' * Tunnel URL:', url)
    # Now that we have our URL, Use the SignalWire's Update an Incoming Phone Number API
    client.incoming_phone_numbers.list(
        phone_number= sw_phone_number)[0].update(
            sms_url=url + '/sms_app') # Notice we update the parameter sms_url

# In the previous step, we declared where the tunnel will be opened, however we must start ngrok before a tunnel will be available to open
# This checks your os to see if ngrok is already running and if it isnt, will begin running
if __name__ == '__main__':
    if os.environ.get('WERKZEUG_RUN_MAIN') != 'true':
        start_ngrok()
    app.run(debug=True)
What do I need to install to run this code?
There are a few packages that will need to be installed in order to run this snippet. Execute the below command in your terminal to install the packages needed for this snippet.
You must have the SignalWire Python SDK installed. You can install that HERE
The SignalWire SDK will allow us to swiftly execute different SignalWire APIs. Additionally, we will be using the MessagingResponse package. This package allows us to transfer our backend code into an XML format that can be interpreted by the webhook.
The pyngrok library will allow us to start a tunnel to our local application. This can be opened on whichever port is specified.
Lastly, the flask library is a web application framework written in Python that will give our application the ability to listen to activities done on our local server.
$ pip install pyngrok flask signalwire
What variables do I need to change?
sw_phone_number – Populate the ‘numbers’ array towards the end of the code, with the numbers that you are wanting to analyze. These must be formatted as ‘+1XXXYYYZZZZ’
ProjectID - Your project ID is an alphanumeric string that tells the SignalWire SDK where to find your project. You can find this in an easily copyable format by going to your
SignalWire Portal and clicking the API tab on the lefthand side.
AuthToken - Your Auth Token is an alphanumeric string that helps to authenticate your HTTP requests to SignalWire. You can create this (if you haven’t already) or copy this in an easily copyable format by going to your SignalWire Portal and clicking the API tab. If you have not created an API token, press the blue new button. If you have, click show and copy the string.
SpaceURL - Your Space URL is the domain of your Space, i.e. example.signalwire.com. This can also be found in an easily copyable format within the API tab in your SignalWire Space.
The Code
import os
from pyngrok import ngrok
from flask import Flask, request
from signalwire.messaging_response import MessagingResponse
from signalwire.rest import Client as signalwire_client

# Input User Authentication into Client
ProjectID= "AAAAAAAA-BBBB-CCCC-DDDD-EEEEEEEEEEEE"
AuthToken= "PTXXXXXXXXXXXXXXXXXXXXXXXXXXXXXXXXXXXXXXXXXXXX"
SpaceURL = 'SPACE.signalwire.com'
sw_phone_number= '+1AAABBBCCCC'

client = signalwire_client(ProjectID, AuthToken , signalwire_space_url = SpaceURL)

# Initialize the Flask object
app = Flask(__name__)


# Define what we would like our application to do
@app.route("/sms_app", methods=['GET', 'POST'])
def sms_app():

    # Find the body of the incoming message and send out a response based on that string
    body = request.values.get('Body', None)

    # Start our message response
    resp = MessagingResponse()

    # Determine the proper body to reply back to the sender
    # If anything besides 'y' or 'n' comes in as the body, the application will send out the standard prompt (listed underneath the else statement)
    if body == 'y':
        resp.message("Great! You will report to the Death Star for training tomorrow")
    elif body == 'n':
        resp.message("No problem, may the sith be with you")
    else:
        resp.message(f'Would you like the First Order to contact you about career opportunities around the galaxy?(y/n)')
    return str(resp)


# Set the ngrok URL as the webhook for our SW phone
def start_ngrok():
    # Set up a tunnel on port 5000 for our Flask object to interact locally
    url = ngrok.connect(5000).public_url
    print(' * Tunnel URL:', url)
    # Now that we have our URL, Use the SignalWire's Update an Incoming Phone Number API
    client.incoming_phone_numbers.list(
        phone_number= sw_phone_number)[0].update(
            sms_url=url + '/sms_app') # Notice we update the parameter sms_url


# In the previous step, we declared where the tunnel will be opened, however we must start ngrok before a tunnel will be available to open
# This checks your os to see if ngrok is already running and if it is not, ngrok will start
if __name__ == '__main__':
    if os.environ.get('WERKZEUG_RUN_MAIN') != 'true':
        start_ngrok()
    app.run(debug=True)
The Output
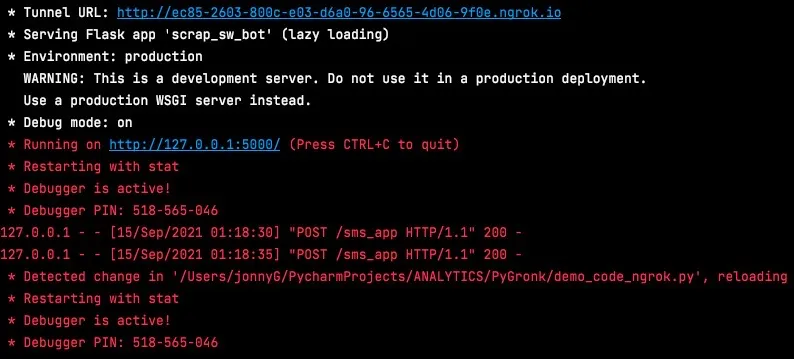
After your program has run properly, your console should look something similar to this below. All of that Red is actually good in this case because we can see that we are connected and running our webhook. There was some activity to our project and we can see that there were two incoming messages to our application. Both with status 200 so all should be working well.

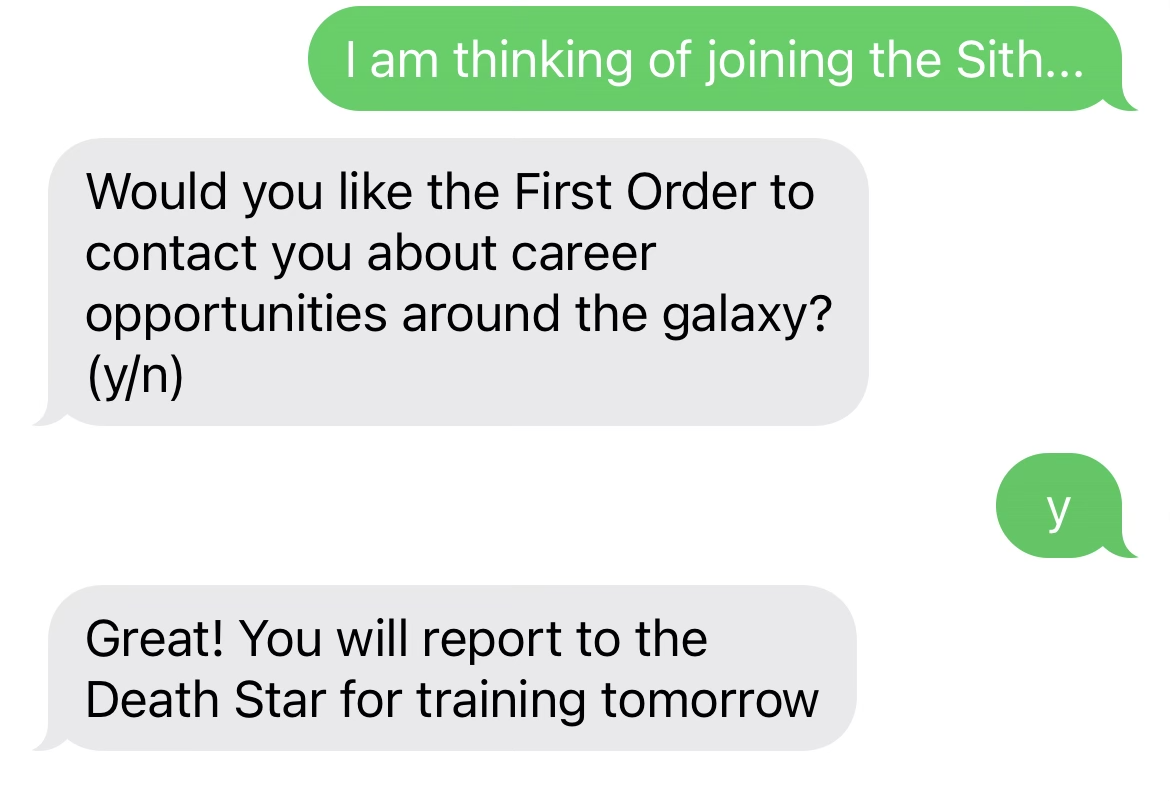
Now, it's time to test our application by texting into it!

Not a Python Fan? No Problem
Through the pyngrok method, we were able to publicly expose the code that was being run on our locally hosted flask framework. However, there are many more possible methods to take if you would like to run your application in a different server-side language other than python.
As a first step to replicating in a different language, you will need to find a web development framework that is compatible with your language. Any framework that can push your application to localhost will be compatible with ngrok. Whether you want to use Flask, React, Django, Sinatra, Express, or many more, ngrok can help.
Secondly, you will need to run both your framework and ngrok on the same port. Once these two are running, your local web app will get a facelift and become visible as a Public URL.
Lastly, you will need to tell SignalWire where to find your application. This can be done through the Update an Incoming Phone Number API and setting the appropriate parameter. In our example, we set the Messaging Webhook for our number so we updated the SmsUrl parameter of the API with our public URL.
Conclusion
Throughout this guide, you were introduced to a roadmap of turning your local backend application into a publically accessed webhook. After creating a public URL, we were able to update a SignalWire number's SMS webhook so that we can carry out the instructions highlighted in our backend application.
If you would like to test this example out, create a SignalWire account and Space.
Please feel free to reach out to us on our Community Discord or create a Support ticket if you need guidance!