Simple Video Demo
SignalWire's Video API allows you to host real-time video calls and conferences on your website or app. In this guide, we will use SignalWire APIs in three steps to create a minimal full-stack video-calling website.
This is what we will cover:
- Registering with SignalWire to obtain your API key and Project ID
- Writing a minimal backend server in Node.js. This is a simple proxy server, so if you prefer you can use any platform such as PHP or Python.
- Developing a simple frontend web app in JavaScript. The SignalWire Browser SDK will do most of the work for us.
When the site is finished, it will look something like this:
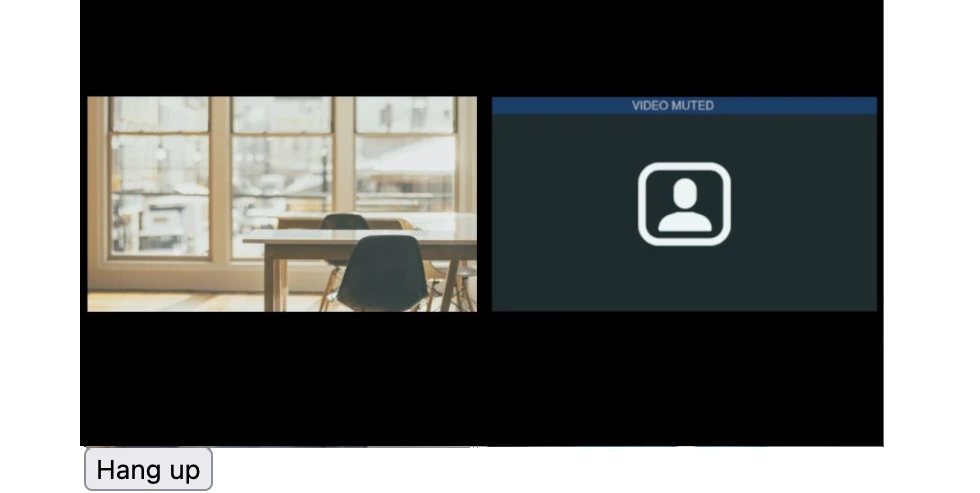
The end result of this tutorial.
Obtaining your API key and Project ID
First, we will need access to the SignalWire APIs. If you already have a SignalWire account, can sign in to the SignalWire website. If you're not already registered, you can sign up in trial mode, which comes with a $5 credit. This will be plenty to follow along with this guide.
Once you've signed up and verified your email, create a new project. Next, navigate to the API Credentials page page of your SignalWire Dashboard.
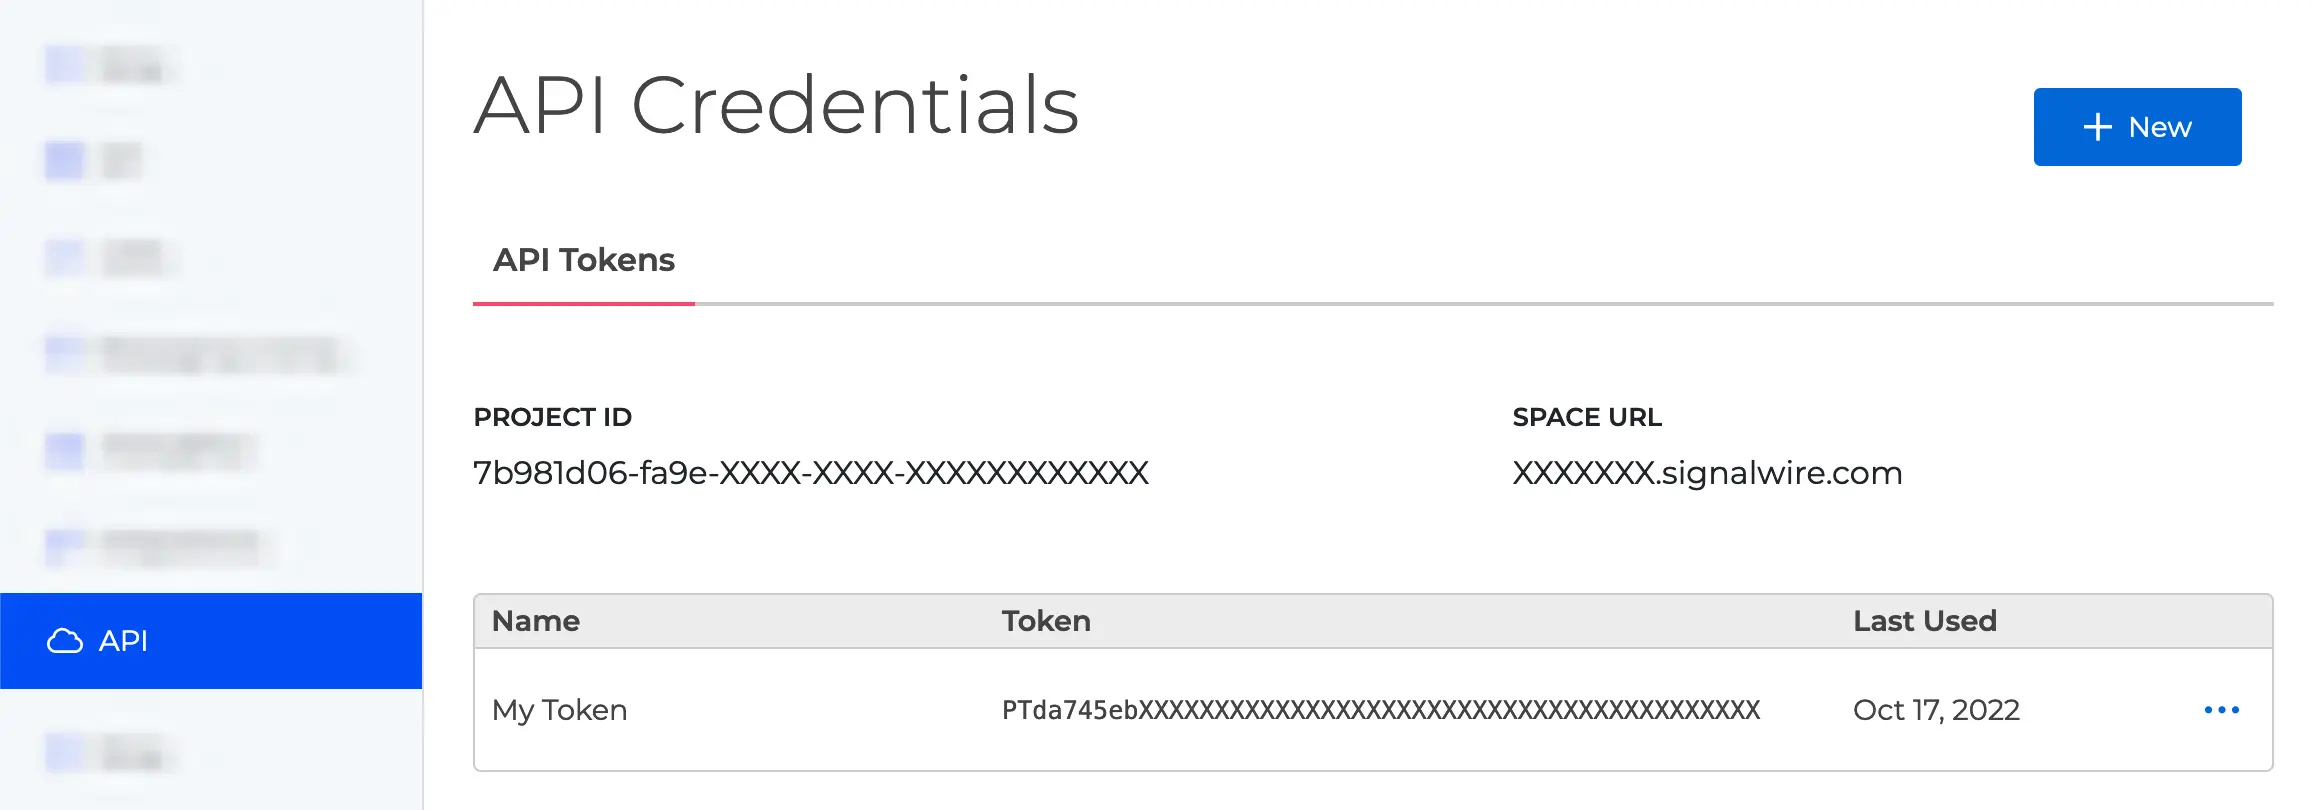
Two important pieces of information about our project are displayed there:
-
Space URL: You'll use this URL to access SignalWire APIs
-
Project ID: You'll use this UUID to specify your project to the API
There is one more piece of information that we need from our new project. We need to generate an API token to access SignalWire's APIs from our own code.
To generate an API token, click on the New Token button. Give it an easily identifiable name, and make sure that the "Video" scope is enabled. Then hit "Save".
It is important that the API tokens are not publically exposed. They can be used to make API requests on your behalf. Take extreme care to make sure that the tokens are not pushed to GitHub or exposed in frontend code. For Node.js backends, you can use dotenv files or similar mechanisms to safely store confidential constants.
Now that we have collected the Project ID, the Space URL, and the API token, we can start writing our application.
Backend
Why do I need my own backend?
As mentioned in the previous section, API tokens must be kept confidential. When you build a web application or any application that runs on a user's device, the code running on the device should be considered untrusted (secrets can be stolen). S ince you must use the API token from a trusted environment, you do so in your own server. Having your own backend server also allows you to build custom authorization policies instead of giving every client admin access.
The figure below illustrates the typical network interaction we are building. Your server can directly access the SignalWire servers (for example, to get a list of active rooms). However, for a client to interact with SignalWire servers, it must first ask your server to provide a limited-scope token (we call this the Video Room Token).
A diagram showing the relationship between SignalWire Servers, Your Server, and the Client, such as a browser or app. The SignalWire Servers communicate a list of rooms and the requested Video Room Token to Your Server. The Client interfaces with SignalWire Servers to join the room, transmit WebRTC video stream and events, and perform room actions like changing room layout, muting audio, and leaving the room.
The API token gives full access to SignalWire APIs. Whoever owns the API token can, for example, delete any room, mute or unmute any participant, and so on without limitations. You may only use the API token in your server to communicate with SignalWire.
The Video Room Token is a limited-scope token that clients can use to access SignalWire APIs without knowing the API token.
Clients must ask your proxy server for a Video Room Token.
Your server will obtain it from SignalWire servers and pass it back to the client.
Video Room Tokens are associated with a given <_user_, _room_> pair, so you can think of them as a personal key for a given user to access a given room.
Your server sets the permissions for each Video Room Token, for example, whether they are allowed to mute other users.
Getting a Video Room Token using cURL
Let's take a look at how our backend will use the API token to get a Video Room Token. To get a token from the REST API for a user with name "john" and a room "office" with only video muting permissions, we can use this call:
curl --request POST \
     --url 'https://your_space_url.signalwire.com/api/video/room_tokens' \
     --user 'project_id:api_token' \
     --header 'Content-Type: application/json' \
     --data '{"user_name": "john", "room_name": "office", "permissions": ["room.self.video_mute"]}'
You can see a complete list of possible permissions and video token parameters in our documentation.
The JSON response from the API will look like this and can be safely sent to the client:
{
  "token": "eyJ0eXAiOiJWUlQiLCJhbGciOiJIUzUxMiJ9.eyJpYXQiOjE2MzI0OTE3ODAsImp0aSI6ImM2NmU3ODlkLTJmMjItMTIzNC1hNzMzLThlZjA2MzdmNWI2YiIsInN1YiI6ImExNmQ4ZjllLTIxNjYtNGU4Mi01Njc4LWE0ODQwZjIxN2JjMyIsInUiOiJqb2huIiwiciI6Im9mZmljZSIsInMiOlsicm9vbS5yZWNvcmRpbmciXSwiYWNyIjp0cnVlfQ.qYQwQ1PEnzGbAIb1RoVuYLf0mlqApi15wSC2n7QMCFP4M7jOjOIb_Ia_BhKnbnTHb7sI78d2jS7f_qsFV2OHLw"
}
Getting a Video Room Token using your own server
Instead of using curl, and to allow for more granular control over permissions alongside user authentication,
we'll create a server to accept an incoming request for a Video Room Token, obtain the Video Room Token, and send it back to the client.
Our server only needs to expose a single endpoint, which we will call /get_token (but it can be anything you want).
// Auth constants to be stored in a dotenv file (or equivalent) with gitignore
const auth = {
  username: "xxxxxxxx-xxxx-xxxx-xxxx-xxxxxxxxxxx", // Project ID
  password: "PTxxx...xxx", // API token
};

const apiurl = "https://<your_space_url>/api/video";

// Endpoint to request Video Room Token for video call
app.post("/get_token", async (req, res) => {
  let { user_name, room_name } = req.body;

  console.log("Received name", user_name);

  try {
    // get the Video Room Token from SignalWire
    let token = await axios.post(
      apiurl + "/room_tokens",
      {
        user_name: user_name,
        room_name: room_name,
        permissions: [
          "room.list_available_layouts",
          "room.set_layout",
          "room.self.audio_mute",
          "room.self.audio_unmute",
          "room.self.video_mute",
          "room.self.video_unmute",
        ],
      },
      { auth }
    );
    console.log(token.data.token);

    // send the Video Room Token back to the client
    return res.json({ token: token.data.token });
  } catch (e) {
    console.log(e);
    return res.sendStatus(500);
  }
});
Let's break this piece of code down.
-
The user's
user_namewill be used to identify them in the video call, so the frontend will send this information when making a request to our/get_tokenendpoint. Likewise, theroom_namedetermines the name of the room to join. If the room doesn't exist, it will be created automatically. -
We send a post request to the
room_tokensendpoint of SignalWire REST APIs. Theroom_tokensendpoint sends back a Video Room Token that we can forward to our client.
Now we have everything we need to start building the frontend.
Frontend
The SignalWire Browser SDK makes it surprisingly easy to integrate video calling into any web application. It only takes a few minutes to set up the basics. First, we need to include the SDK in our HTML.
<!-- Import SignalWire library -->
<script src="https://cdn.signalwire.com/@signalwire/js"></script>
Then you can interact with the SDK using the global variable SignalWire.
We'll mainly be interested in the SignalWire.Video.RoomSession class for this guide, but if you'd like to explore this API,
please browse the SDK documentation.
Before a user can join a room, we need to make a POST request for a Video Room Token to the backend server endpoint we just created.
const backendurl = ""; // Your backend server. If you server and frontend are in the same directory, you can leave this string empty
let token = await axios.post(backendurl + "/get_token", {
  user_name: username,
  room_name: roomname,
});
console.log(token.data);
token = token.data.token;
Then, to start the video session, we instantiate a new RoomSession object and then we join it:
roomSession = new SignalWire.Video.RoomSession({
  token,
  rootElement: document.getElementById("root"), // The HTML element in which to display the video
});

try {
  await roomSession.join();
} catch (error) {
  console.error("Error", error);
}
The other important key-value parameter to pass is a rootElement.
The root element is an empty HTML element in your DOM (for example, a <div>).
It will serve as the container for the video stream.
When roomSession.join is called, the SDK will join the room, and the video will appear in rootElement.
These pieces are all you need to get the video up and running. However, we can polish our application by using the Events included on the Room Session object.
Using Events
The Room Session object supports the standard .on() method to attach event listeners and the corresponding .off() method to detach them.
You should subscribe to events after the room is created but before joining the room. Some of the events you might subscribe to are:
room.joined: you have joined the roomroom.updated: a room property has been updatedroom.ended: the room has endedmember.updated: a member property has changed (e.g., video muted)member.updated.audio_muted: the audio_muted state has changed for a membermember.updated.video_muted: the video_muted state has changed for a membermember.updated.visible: the member is now visible in the video layoutmember.left: a member left the roomlayout.changed: the layout of the room has changed
Find the complete list in our API reference.
Here's how we can use some these events in our example program:
roomSession.on("room.joined", (e) => logevent("You joined the room"));
roomSession.on("member.joined", (e) => logevent(e.member.name + " has joined the room"));
roomSession.on("member.left", (e) => logevent(e.member.id + " has left the room"));
Putting it All Together
All the above ideas can be combined to create the following function, which we'll use (with minor variations) in the frontend.
async function join() {
  const username = $("usernameinput").value.trim();
  const roomname = $("roomnameinput").value.trim();
  gotopage("loading");

  try {
    token = await axios.post(backendurl + "/get_token", {
      user_name: username,
      room_name: roomname,
    });
    console.log(token.data);
    token = token.data.token;

    try {
      try {
        roomSession = new SignalWire.Video.RoomSession({
          token,
          rootElement: document.getElementById("root"),
        });
      } catch (e) {
        console.log(e);
      }

      roomSession.on("room.joined", (e) => logevent("You joined the room"));
      roomSession.on("member.joined", (e) =>
        logevent(e.member.name + " has joined the room")
      );
      roomSession.on("member.left", (e) => logevent(e.member.id + " has left the room"));

      await roomSession.join();
    } catch (error) {
      console.error("Something went wrong", error);
    }

    gotopage("videoroom");
  } catch (e) {
    console.log(e);
    alert("Error encountered. Please try again.");
    gotopage("getusername");
  }
}
Please visit our GitHub page to see complete code or fork the repository.
Conclusion
Here is the final result of our development with a preview of some added features:
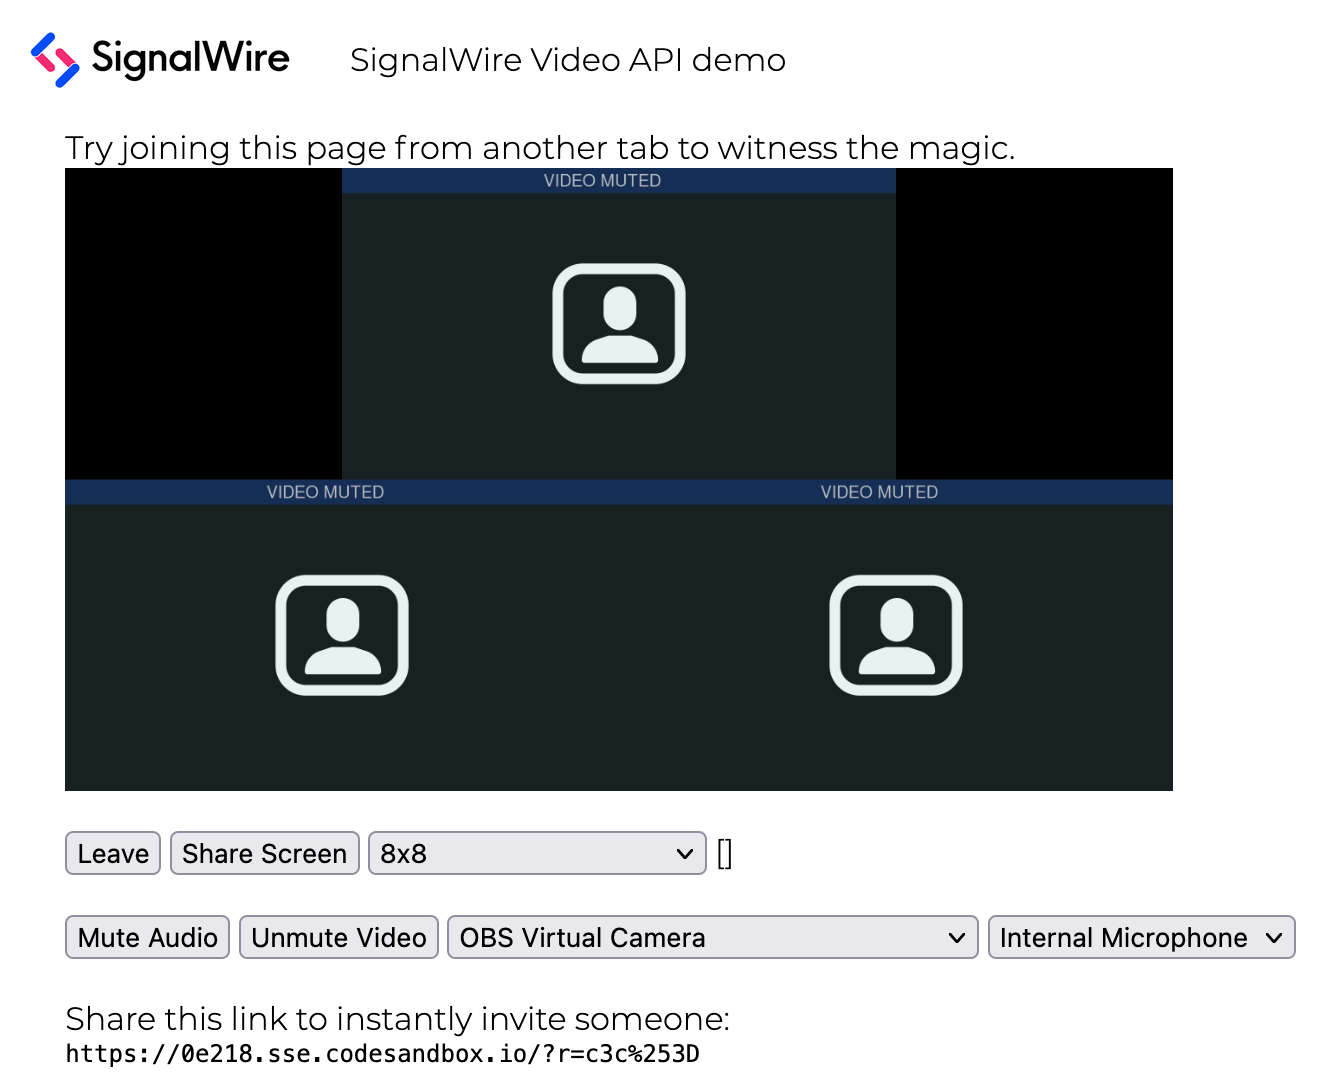
The most noteworthy thing about SignalWire Video technology is that it only streams a single video stream no matter how many participants there are. The video is composited on powerful SignalWire servers by stitching all of the individual video streams together. So you can invite as many people as you like to your virtual video party. Your app will run without a hitch.
What now? If you would like a custom approach that adds to what we developed here, visit one of our guides below. If you prefer a guide to build a standard, polished video application from scratch, you can see our Zoom Clone Guide.