Streaming to YouTube and Other Platforms
In this guide, we will show how to stream a video room to external services like YouTube. We are going to use the Streaming APIs, which represent the simplest way to set up a stream, and the Browser SDK.
Getting started
To get started, we need to create a video room, or find the id of an existing one. You can create a new room either from the REST APIs, or from the UI. For this guide, we will use a room with UI included. See Integrating Video Conferences With Any Website in Minutes for instructions on how to create a room.
You also need to set up your streaming service. Any service supporting RTMP or RTMPS works with SignalWire. In any case, you will need a stream URL and, sometimes, a stream key. For YouTube, you will find your stream key and your stream URL in a screen such as the one depicted in the image below.
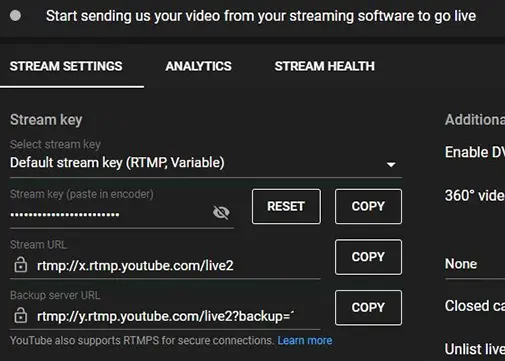
YouTube stream parameters. Regardless of the streaming service that you are using, you need to make a note of the stream URL (which usually starts with "rtmp") and, when provided, of the stream key.
Connecting the stream with the Dashboard UI
If you would like your video conference to start a stream every time you enter the video room, you can set up a stream from the room's settings. This will start a stream automatically when you join the room from the Dashboard or when you join the room embedded in an external application.
From your Video Dashboard, click on the name of the conference you would like to use. This setting is only available on conferences with UI included. Then, click on the Streaming tab.
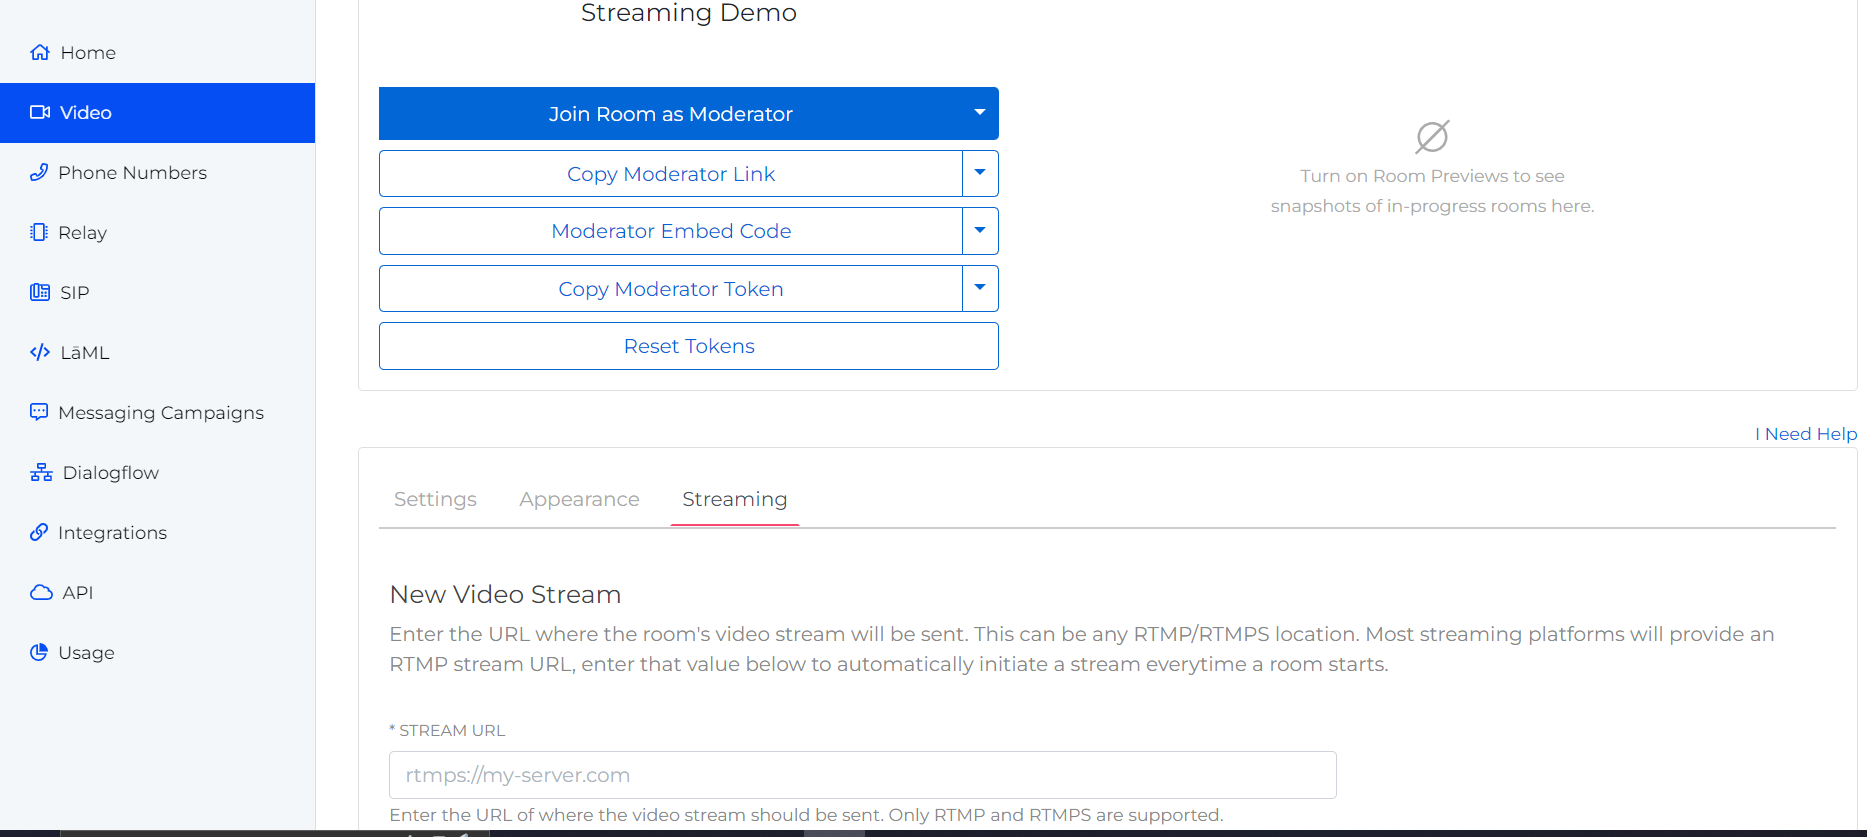
Click the blue "Setup a Stream" button and input the RTMP URL. If there is no stream key, simply use the stream URL that you copied from the streaming service. If you have a stream key, append it to the stream URL, separated by a slash like this: rtmp://<stream_url>/<stream_key>. Then, hit "Save". You can delete the stream later if you need to from the ⋮ menu.
You can now start the room by joining it from the Dashboard or from where it is embedded. You should be able to see your stream in the streaming service within a few seconds.
Setting up streaming in the Programmable Video Conference (PVC) room settings will automatically start the outbound stream in any active instance of the room. That means that if you embed the same PVC in multiple applications, the stream will start when the room is joined from any of those applications. Ensure the room is embedded in a secure application accessible only to users who you would like to be able to stream.
Connecting the stream with REST APIs
We can also use the REST APIs to connect a room to the stream. We need five things:
- Your Space name. This is the
<name>in your Space URL<name>.signalwire.com - Your Project Id.
- Your API token.
- The UUID of the room you want to stream. From your SignalWire Space, open the configuration page for your room: you will find the UUID in the URL, which will look like this:
431dcfbe-2218-44ae-7e2f-b5a11a9c79e9. - The final RTMP URL. If you don't have a stream key, simply use the stream URL that you copied from the streaming service. If you also have a stream key, append it to the stream URL, separated by a slash. Like this:
rtmp://<stream_url>/<stream_key>.
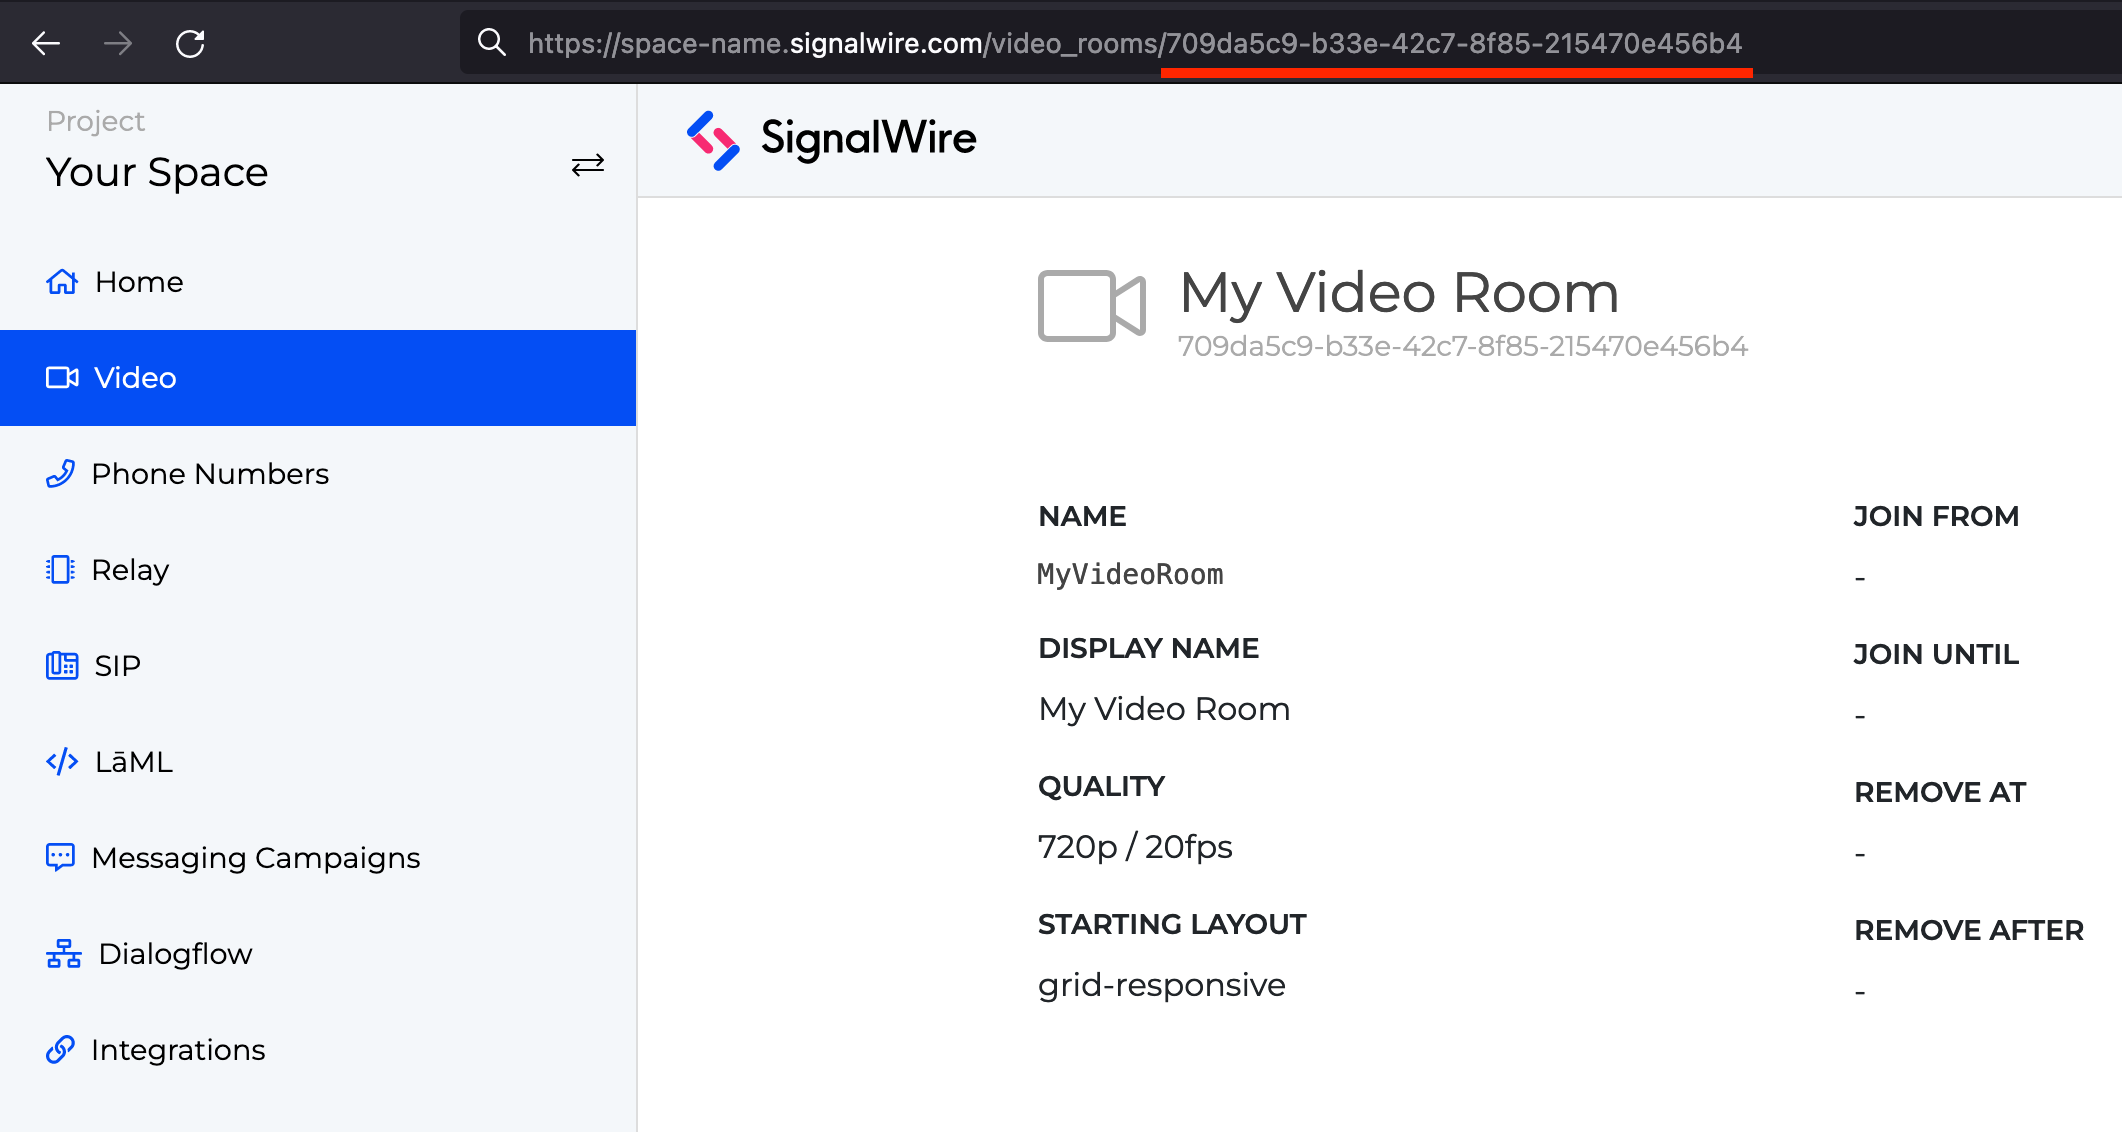
The UUID of the room is in the URL of the configuration page for that room.
We are now ready to associate the stream with the room.
If you are using a room with UI included:
curl --request POST 'https://<your space>.signalwire.com/api/video/conferences/<RoomUUID>/streams' \
    --header 'Content-Type: application/json' \
    --header 'Accept: application/json' \
    -u "<ProjectId>:<APIToken>"
    --data-raw '{
      "url": "<YourFinalRTMPUrl>"
    }'
If you are using a room without UI included:
curl --request POST 'https://<your space>.signalwire.com/api/video/rooms/<RoomUUID>/streams' \
    --header 'Content-Type: application/json' \
    --header 'Accept: application/json' \
    -u "<ProjectId>:<APIToken>"
    --data-raw '{
      "url": "<YourFinalRTMPUrl>"
    }'
You can now start the room by joining it. You should be able to see your stream in the streaming service within a few seconds.
As with setting up a stream in the Dashboard UI, setting the stream with the REST API will automatically start the outbound stream in any active instance of the room. Ensure the video conference is embedded in a secure application accessible only to users who you would like to be able to stream.
Connecting the stream with SDKs
Finally, you may choose to use the Video SDK to set up the stream. With this option, you can build an application that starts and stops the RTMP stream. You can see a full demo application on the Guides Repo.
For this demo, we first created a PVC in the Video Dashboard and copied the embed code. We pasted the embed code in an html file and added buttons to start and stop the stream.
<div id="pvc">
<!--paste PVC embed code here-->
<div id="button-bar">
<form id="rtmp-form">
<label for="stream-url">RTMP Streaming URL</label>
<input
type="url"
id="stream-url"
required
placeholder="rtmp://<stream_url>/<stream_key>"
/>
<button id="start" type="submit">Start Stream</button>
<button id="stop">Stop Stream</button>
</form>
<p id="note">
If your streaming service provides a stream key, append it to the stream URL,
separated by a slash.
<br />
ex: rtmp://<stream_url>/<stream_key>.
</p>
</div>
</div>
Later, we will put click handlers on the start and stop buttons to call startStream and stopStream respectively. The startStream function is available on the Room Session object, so first we need to use the setupRoomSession callback function on the PVC to get that object. So, the VideoConference constructor at the end of the embed script should look like this:
SignalWire.AppKit.VideoConference({
  token: "vpt_40b...458",
  setupRoomSession: setRoomSession,
});
We can then access setRoomSession in the external JavaScript file and use the Room Session object returned to set event listeners and click handlers. The JavaScript file will look something like this:
let roomSession;
let stream;

const stopStream = () => {
  if (stream) {
    stream.stop();
  }
};

const setRoomSession = (session) => {
  roomSession = session;
  roomSession.on("room.left", () => {
    stopStream();
  });
};

document.addEventListener("DOMContentLoaded", () => {
  document.getElementById("rtmp-form").onsubmit = async (e) => {
    e.preventDefault();

    const url = document.getElementById("stream-url").value;
    try {
      stream = await roomSession.startStream({ url });
    } catch (error) {
      console.log(error);
      alert(
        "There was an error starting the stream. Please check your URL and try again."
      );
    }
  };

  document.getElementById("stop").onclick = (e) => {
    e.preventDefault();
    try {
      stopStream();
    } catch (e) {
      console.log(e);
    }
  };
});
The full demo application has some cosmetic additions, but these two files are all you need to get an RTMP outbound stream set up from any application with an embedded PVC. You should be able to see your stream in the streaming service within a few seconds of pressing "Start Stream".
While this demo used a PVC, you can use the same methods on a video room without the prebuilt UI. For a complete guide on building video rooms without a prebuilt UI, see Simple Video Demo. From there, you can add start and stop stream buttons and hook them up in the same way as above.
Wrap up
We showed the options to configure an RTMP stream that allows you to stream the content of your video room to any compatible streaming service: the Dashboard UI, a POST request, or an SDK application is all you need.