Two Factor Authentication via SMS
Two Factor Authentication (2FA) can provide your users protection against many security threats that target user passwords and accounts. This application will generate a one-time password sent to the recipient's phone number via SMS. Application developers can enable two-factor authentication for their users with ease and without making any changes to the existing application logic or database structure!
Required Resources
View the full code on Github:
This guide uses the RELAY Realtime API for the JavaScript demo and the Python SignalWire SDK in the Python demo.
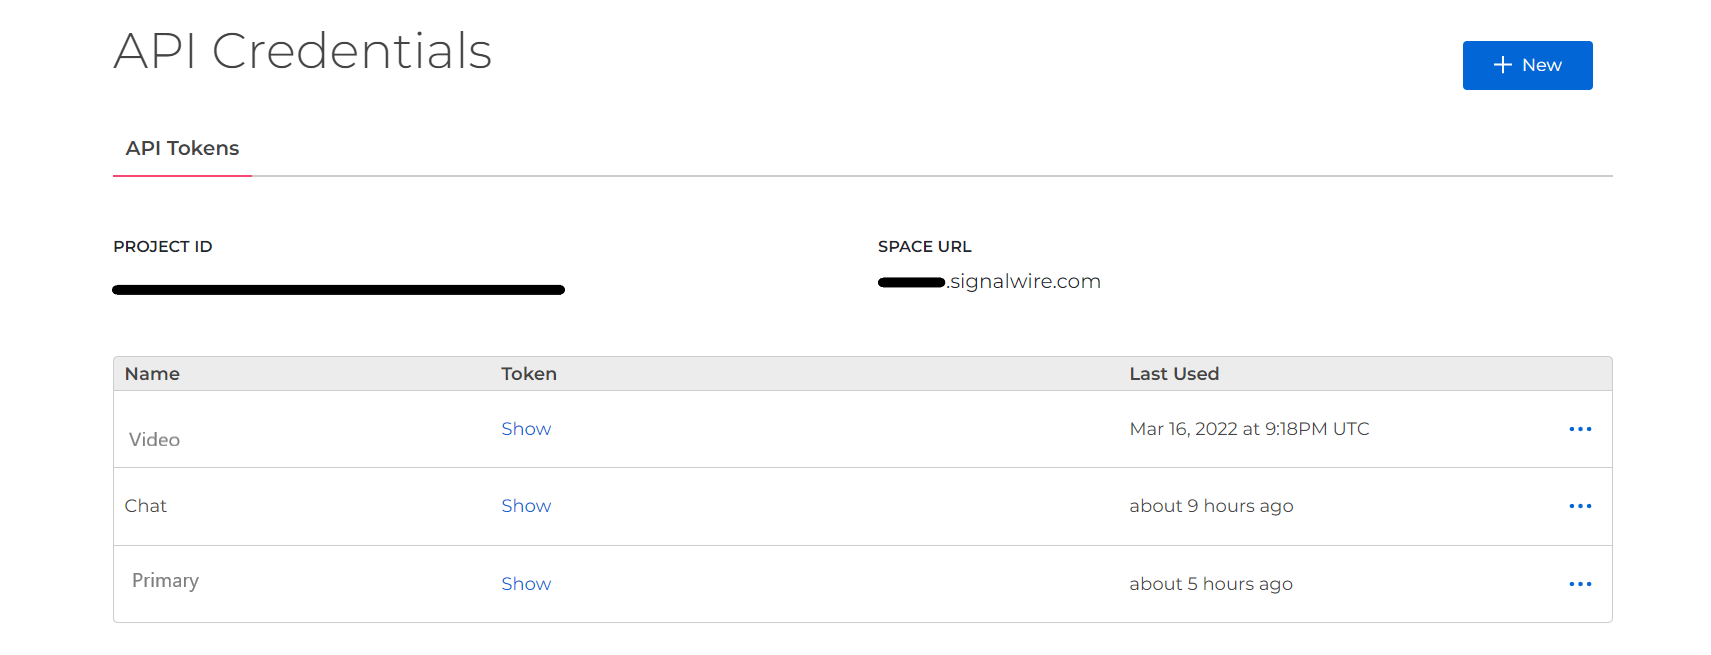
You will need a SignalWire phone number as well as your API Credentials (API Token, Space URL, and Project ID) which can all be found in an easily copyable format within the API tab of your SignalWire portal. If you do not know where to find these values, check out our guide to Navigating your SignalWire Space!
How to Run the Application
In Node.js
Build a docker image with docker build -t sms-two-factor-auth . and run your image with docker run --publish 5000:3000 --env-file .env sms-two-factor-auth. The application will run on port 5000.
Natively, clone the repo and run yarn start or npm start from the command line. The application will run on port 3000.
In Python
Build a Docker image with docker build -t snippets-text-two-factor-auth . and run it with docker run --publish 5000:5000 --env-file .env snippets-text-two-factor-auth.
To build and run it natively, execute export FLASK_APP=app.py then run flask run.
The application will run on port 5000.
You may need to use an SSH tunnel for testing this code if running on your local machine. – we recommend ngrok. You can learn more about how to use ngrok here.
Code Walkthrough
Jump to:
Node.js
This guide is available for Relay V3 and for Relay V4. You are currently viewing the guide for Relay V4. To switch to the older Relay V3 guide, please use the selection field below:
In the repository, you will see several files, but the only file that will need to be altered is the example.env file containing our environment variables.
Setup Your Environment File
- Copy from example.env and fill in your values
- Save a new file called .env
Your file should look something like this
# Your Project ID - you can find it on the `API` page in your Dashboard.
SIGNALWIRE_PROJECT=
# Your API token - you can generate one on the `API` page in your Dashboard
SIGNALWIRE_TOKEN=
# The phone number you'll be using for this guide. Must include the `+1`, E.164 format
SIGNALWIRE_NUMBER=
The Frontend
The frontend is a simple UI for testing and demo purposes. You may choose to embed these forms separately on different pages of your application. For our simple purposes, both forms are on one page, and success and error messages will be sent to the browser, navigating the user away from the forms page.
<body>
  <div class="body">
    <form method="POST" action="/request-auth">
      <h1>Request a One-time Authentication Code</h1>
      <label>Phone Number</label>
      <input
        type="tel"
        placeholder="E.164 phone number (e.g. +19991234567)"
        name="number"
      />
      <button>Request Code</button>
    </form>
  </div>
  <div class="body">
    <form method="POST" action="/validate-auth">
      <h1>Validate with Your Authentication Code</h1>
      <label>Phone Number</label>
      <input
        type="input"
        placeholder="E.164 phone number (e.g. +19991234567)"
        name="number"
      />
      <label>Authentication Code</label>
      <input type="input" placeholder="6-digit code from the SMS" name="auth_code" />
      <button>Authenticate</button>
    </form>
  </div>
</body>
The Backend
The backend consists of a standard Express server, an endpoint to generate and send the one-time auth code, and an endpoint to verify an auth code.
First we import libraries and set up the server:
require("dotenv").config();
const { Messaging } = require("@signalwire/realtime-api");
const { phone } = require("phone");

const express = require("express");
const app = express();
const port = 3000;
const bodyparser = require("body-parser");

app.use(bodyparser.urlencoded({ extended: true }));
app.use("/", express.static("html"));
The /request-auth route will initialize a Messaging Client, generate a random 6-digit code, and send it to the number provided from the frontend.
const data = { requests: [] };

const requestAuth = async (req, res) => {
  const authClient = new Messaging.Client({
    project: process.env.PROJECT_ID,
    token: process.env.API_TOKEN,
    contexts: ["auth"],
  });

  // Generate a random 6 digit code between 123456 - 987654, inclusive
  const min = 123456;
  const max = 987654;
  const code = Math.floor(Math.random() * (max - min + 1) + min);

  // Check for for proper E.164 format
  const numberInput = req.body.number;
  const phoneInfo = phone(numberInput);
  const number = phoneInfo.phoneNumber;
  if (!phoneInfo.isValid) return res.status(400).send("Invalid Phone Number");

  data.requests.push({
    number,
    code,
  });

  try {
    const status = await authClient.send({
      from: process.env.SIGNALWIRE_NUMBER, // The number you bought from SignalWire
      to: number,
      body: "Your authorization code is:" + code,
    });

    console.log(status);
    return res.status(200).send("Your code was sent");
  } catch (e) {
    console.error(e);
    return res.status(500).send("Error sending code via SMS");
  }
};
The /validate-auth route will check the stored auth codes for the number and code passed from the frontend, remove the entry if found, and send a success message to the user.
const validateAuth = (req, res) => {
  const code = req.body.auth_code;
  const numberInput = req.body.number;
  // Check for for proper E.164 format
  const phoneInfo = phone(numberInput);
  const number = phoneInfo.phoneNumber;
  if (!phoneInfo.isValid) return res.status(400).send("Invalid Phone Number");

  const requestCount = data.requests.length;
  data.requests = data.requests.filter((s) => {
    !(s.number === number && s.code === code);
  });
  // If the request was filtered out, the auth code matched and we return 200
  // If nothing was filtered out, no match was found and we return 403
  return requestCount === data.requests.length
    ? res.status(403).send("Forbidden")
    : res.status(200).send("Success!");
};
Python
Within the Github repository you will find 3 files:
- Dockerfile
- example.env
- app.py
The only file that will need to be altered is the example.env file containing our environment variables.
Setup Your Environment File
- Copy from example.env and fill in your values
- Save a new file called .env
Your file should look something like this
## This is the full name of your SignalWire Space. e.g.: example.signalwire.com
SIGNALWIRE_SPACE=
# Your Project ID - you can find it on the `API` page in your Dashboard.
SIGNALWIRE_PROJECT=
# Your API token - you can generate one on the `API` page in your Dashboard
SIGNALWIRE_TOKEN=
# The phone number you'll be using for this guide. Must include the `+1`
SIGNALWIRE_NUMBER=
Configuring the code
We need to start by creating variables to store all the data from the authentication session.
data = {}
data['requests'] = []
Next, we will define a function that looks up the phone number and verifies that the code is correct. We will loop through all authentication sessions, and check if there is a matching number while first adding a + to make sure the number is in E164 format. If there is a session matching that number, we will complete our second check to see if the code they provided was correct. If both conditions are satisfied, we will remove the validated session from the data dictionary created above.
def lookup_code(number,code):

    # Loop through all sessions
    for i in range(len(data['requests'])):
        # Look if number is equal to a number in a session, we are prepending a '+'
        if '+' + number == data['requests'][i]['number']:
            # Great, We found a session matching that number, now let us check the challenge code
            if code == data['requests'][i]['code']:
                # We have a match, let's remove the validated session and return true
                data['requests'].pop(i)
                return True
    # Catch all for failed challenges
    return False
Now that we have defined our variables and our functions, we need to move on to the Flask routes! We will start by defining a route called /validate-auth that will validate the authentication request. We will grab the authorization code and the phone number from the GET/POST request and call our previously defined lookup_code(number, code) function. If the lookup & authentication are successful, we will return a 200 OK. If the lookup is unsuccessful, we will return a 403 FORBIDDEN.
# Listen for '/validate-auth' route
@app.route('/validate-auth')
def validate_auth():
    # Grab the authorization code from the GET/POST request
    check_code = request.values.get('auth_code')
    # Grab the phone number from the GET/POST request
    number = request.values.get('number')

    # Verify the number and challenge code
    if lookup_code(number, check_code):
        # Return 200, On Accept
        return "200"

    # Return 403, On Forbidden
    return "403"
The next route we define is what will be called when you want to create an authentication request. We start by instantiating the SignalWire client using the Project ID, Auth Token, and Space URL. Then we will generate a random 6-digit code between 123456 and 987654. Next, we get the phone number that we're going to send the message to and add both the code and number to our global data object. Lastly, we will use the Create Message endpoint in order to send a message to the requested number with the generated code.
# Listen on '/request-auth' for creation of an challenge session from GET/POST requests
@app.route('/request-auth', methods=['GET', 'POST'])
def request_auth():

    # Initialize SignalWire client
    client = signalwire_client(os.environ['SIGNALWIRE_PROJECT'], os.environ['SIGNALWIRE_TOKEN'],
             signalwire_space_url = os.environ['SIGNALWIRE_SPACE'])

    # Generate a randome 6 digit code between 123456 - 987654
    auth_code = str(random.randint(123456,987654))
    # Get the phone number to challenge from request
    number = "+" + request.values.get('number')

    # Add the session to the in-memory global request object
    data['requests'].append({
        'number': number,
        'code': auth_code
    })

    # Send a message, with challenge code to phone number provided.
    message = client.messages.create(
        from_=os.environ['SIGNALWIRE_NUMBER'],
        body= "Your authorization code is: " + auth_code,
        to= number
    )

    # Return 200
    return "200"
Wrap Up
There are never too many precautions to take when dealing with keeping your account private and ramping up security. Through SignalWire's SDKs and a little help from a random number generator, you can create your own Two Factor Authentication system within minutes.
SignalWire does offer MFA endpoints you can learn about HERE to request a Multi-Factor Auth Token via SMS, request a Token via phone call, and verify tokens. This is a great option that works right out of the box if you don't need to control how it works under the hood.
Resources:
- Python 2 Factor Auth Github Repo
- Python SignalWire SDK
- SMS/MMS Best Practices - How to Ensure Message Delivery
- Multi-Factor Authentication
Sign Up Here
If you would like to test this example out, create a SignalWire account and Space.
Please feel free to reach out to us on our Community Slack or create a Support ticket if you need guidance!