Building Chat Apps with React
When building a frontend communication application, you have probably had to deal with a plethora of complicated details like setting up or renting your own communication infrastructure, making sense of the ever-elusive WebRTC specs and implementations, making sure everything is scalable, supports all major browsers, and so much more. In this guide, we will walk through how to use SignalWire Chat JS SDK integrated with React, a popular frontend framework, to create a robust IP message Chat application.
The Frontend
We have prepared a simple live example which will be the reference implementation for this guide. Please check out the Sandbox. You can also find the same sample code on GitHub.
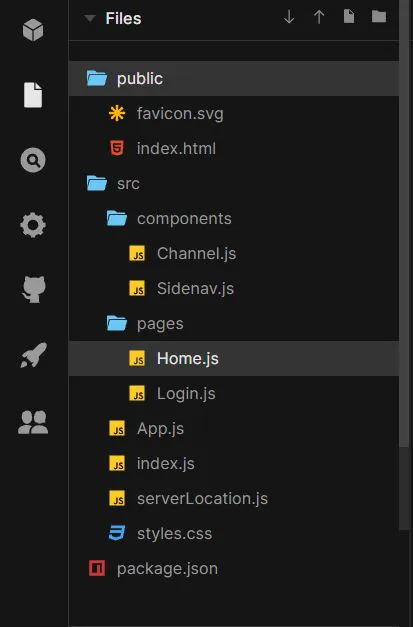
Components
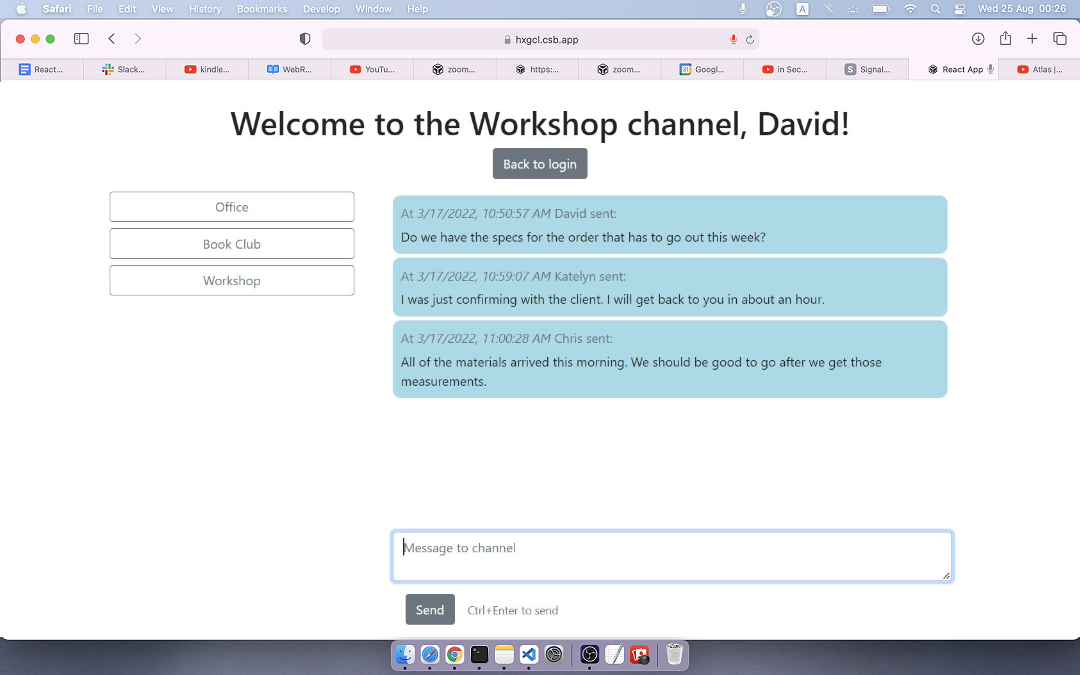
The demo is built with two simple pages, with the home page constructed with two components.
This guide will reference these components:
- the Login page where the user will input a username and channels to subscribe to;
- the Home page which shows a channel list on the left and messages from the active channel on the right;
- the Sidenav component which displays all of the subscribed channels and tracks the active channel;
- the Channel component which diplays the messages sent to the active channel and a text area for a user's new message input.
Connection
To connect to the SignalWire API and make this framework functional, you must include the SDK in your HTML.
<!-- Import SignalWire library -->
<script src="https://cdn.signalwire.com/@signalwire/js@3"></script>
If you prefer, you can install the npm package @signalwire/js.
With either alternative, you can now import {Chat} from "@signalwire/js" and access it in your components. We'll mainly be interested in the Chat.Client class for this guide, but if you'd like to explore this API, please browse the SDK documentation.
We will start in the Login component by obtaining an authentication token and instantiating a Client object. The Client constructor takes a token parameter. This is an authentication token that defines (among other things) the channels which the client is allowed to read and write. To subscribe to channels in the Home component, you must ensure that the channels you're subscribing to are allowed by the token you obtain here.
const reply = await axios.post(SERVERLOCATION + "/get_chat_token", {
  member_id,
  channels,
});

const chatClient = new Chat.Client({
  token: reply.data.token,
});
Notice that when we request a token, we specify a member_id (which can be any unique string of your choice) in addition to the list of allowed channels. This interface is not specific to the SignalWire SDK: when you write your own server, you will be free to specify any parameters you need for the /get_chat_token endpoint.
Tokens are provided to the client by your custom server. Your server determines whether the user is authorized to access the chat and, if they are, asks SignalWire to emit a token. For demo purposes, you can obtain a public access token from our demo server. To do so, set SERVERLOCATION to https://2u5lf.sse.codesandbox.io:8080. If you would like to build your own backend for a production-quality application, see the Backend section for guidance.
After we successfully create the Chat Client, we use the App.js wrapper to pass username, channels, and chatClient to the Home component.
Subscribing to Channels, Loading Message History, and Listening for New Messages
Over in the Home component, we will use the list of desired channels to display a list of buttons in the Sidenav component to allow the user to switch between channels. We will subscribe to the active channel and download existing messages, and listen for new messages in the Channel component.
Here is where the power of React comes into play. We will use a useEffect hook to subscribe, retrieve messages, and listen for new messages whenever the user selects a new channel. Because useEffect doesn’t accept asynchronous functions, we need to define and call the async function inside the hook. The default on the first load will be the first channel on the channel list.
useEffect(() => {
  const onLoad = async () => {
    // Initially, we don't strictly need the 'off' or 'unsubscribe'
    // but it's necessary to clean up before switching to the new channel
    chatClient.off("message");
    chatClient.on("message", (message) => {
      setMessages((oldMessages) => [...oldMessages, message]);
    });
    try {
      await chatClient.unsubscribe(channels);
    } catch (_) {}
    await chatClient.subscribe(selectedChannel);

    const messageHistory = await chatClient.getMessages({
      channel: selectedChannel,
    });

    if (messageHistory?.messages) {
      setMessages(messageHistory.messages.reverse());
    }
  };

  onLoad();
}, [chatClient, selectedChannel]);
Note that it is important to unsubscribe from old channels before subscribing to a new active channel. If you skip this step, you may end up receiving events and displaying messages from multiple channels.
Sending Messages
The last element on our frontend is allowing the user to send a message to the active channel. We can do this with the publish method on the Chat Client object:
const publishMessage = async () => {
  await chatClient.publish({
    channel: selectedChannel,
    content,
  });
  setMessage("");
};
Although we've set our default message state as a string, your message doesn't necessarily have to be a string. It can be any JSON-serializable object!
The Backend
Even though SignalWire provides the platform for all chat communications when using the Chat APIs, you still need to write some server-side logic to proxy the SignalWire REST APIs. Your server-side script should work to authenticate your users, manage their permissions, and relay the tokens from the SignalWire's Chat REST APIs to the client's browser. The token has information like the member_id (which we call username in the UI) and the channel permissions for the token's user. The JavaScript SDK running in the client's browser will then use the token to establish a direct connection with the SignalWire servers.
We prepared a live sample proxy server on Code Sandbox. This is the server that supports the frontend linked above. It is a fairly simple setup:
require("dotenv").config();
const auth = {
  username: process.env.PROJECT_ID, // Project-ID
  password: process.env.API_KEY, // API token
};
const apiurl = "https://" + process.env.SPACE_URL;

const express = require("express");
const bodyParser = require("body-parser");
const cors = require("cors");
const axios = require("axios");

const app = express();
app.use(bodyParser.json());
app.use(cors());

app.get("/", (req, res) => {
  if (
    auth.username === undefined ||
    auth.password === undefined ||
    auth.username === "" ||
    auth.password === ""
  )
    return res.send(
      "Hello. My environment variables are not set.<br/> Please set them from your SignalWire Space."
    );
  else return res.send("Hello. I'm alive");
});

// Endpoint to request token for chat token
app.post("/get_chat_token", async (req, res) => {
  const { member_id, channels } = req.body;

  const channelsPerms = {};
  for (const c of channels) {
    channelsPerms[c] = { read: true, write: true };
  }
  try {
    const reply = await axios.post(
      apiurl + "/api/chat/tokens",
      {
        ttl: 50,
        channels: channelsPerms,
        member_id,
        state: {},
      },
      { auth }
    );

    res.json({
      token: reply.data.token,
    });
  } catch (e) {
    //console.log(e);
    console.log(JSON.stringify(e));
    return res.sendStatus(500);
  }
});

async function start(port) {
  app.listen(port, () => {
    console.log("Server listening at port", port);
  });
}

start(8080);
The source above is all it takes to write a functional backend for the Chat application. At the most basic level, it has to provide a single endpoint (here named /get_chat_token) that takes the username, and the requested chat channels and returns a JWT token. The client-side SDK will handle the rest.
Permissions
As you can see in the proxy server code, our example requests read and write permissions on all channels requested on the token. When you build your server, you can design your authorization scheme to limit permissions for each user. As we discussed in the Frontend section, it is important to include these permissions in order to interact with the channels the user subscribes to.
Authentication
If you have used SignalWire APIs before, you are already familiar with the three pieces of information you need to access the APIs:
- PROJECT_ID identifies the project that SignalWire will bill.
- API_KEY is a secret token string generated via the SignalWire Dashboard that can restrict access to a specific SignalWire product. Keeping this a secret is the main reason you need to write a proxy server to conceal it from the browser.
- SPACE_URL is a URL in the format
{your username}.signalwire.com. You will use this URL to access all SignalWire REST APIs.
The SignalWire REST APIs use basic authentication with the Project ID as username and the API Token as the password. Axios makes it easier by simply accepting an auth object, which it will concatenate and encode in base 64 to create a basic authentication token. The REST API endpoints are accessed through your Space URL. See more information on the endpoints in the SignalWire API reference.
Wrap Up
That's all it takes to develop your Chat application with React. We built a standalone chat application, but you can incorporate these methods and components in your larger applications.
Here is a quick list of the resources discussed here if you want to refer back:
Sign Up
If you would like to test this example using your private credentials, you can create a SignalWire account and Space here.
Please feel free to reach out to us on our Community Slack or create a Support ticket if you need guidance!