Creating and Using cXML scripts
What Are cXML scripts?
cXML scripts create a URL endpoint that responds with a set of instructions that can be executed to handle calls, SMS, or fax.
cXML scripts are powerful tools that rely on simple logic.
Commands such as <Gather> can handle call or message flows within the action parameter, but complex logic such as "Press 1 for sales, 2 for support, etc" will require using one of our SDKs and hosting the code on a server instead of using bins.
Gathering Keypad Input is a good example of <Gather>, using simple logic LaML Bins can handle, and what type of logic that would require hosting your own code.
What is the difference between Webhooks and cXML scripts?
Webhooks pass requests to a web application that is hosted from a server or SSH tunnel.
By contrast, cXML scripts are effectively serverless. When a cXML script is given a request it responds directly with XML/LaML commands. You can read more about SignalWire Webhooks in our Webhooks Overview.
What do I need?
All you will need is a SignalWire account, which you can sign up for here. Signing in with your SignalWire username and password will bring you to the Dashboard.
While bins can be created and updated programmatically, this guide will walk you through cXML scripts via the SignalWire Dashboard.
Navigating the SignalWire Dashboard
From the Dashboard:
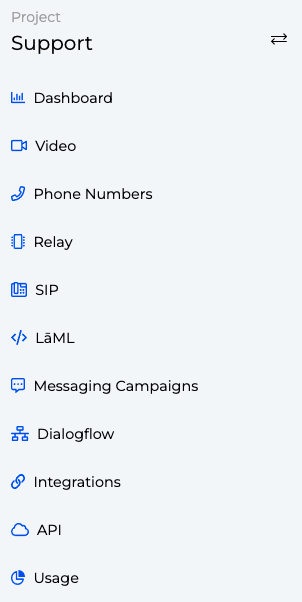
Once you are logged in, on the left-hand side of your Dashboard should be several tabs. For the purposes of this guide, find and select the "LāML" tab.

LaML Logs
Navigating to this tab will open a panel that contains logs for you for items such as Voice, Messaging, etc.
Here you will also notice the Bins tab which is what we are looking for.

The Bins Tab
Once we have navigated to the Bins tab, we will see a list of the bins we have created.
Each bin is listed with its request URL, the amount of requests received, and the last time a request was made to a bin.
In the top right we will see a + New button which will allow us to create a new bin.

New Bin
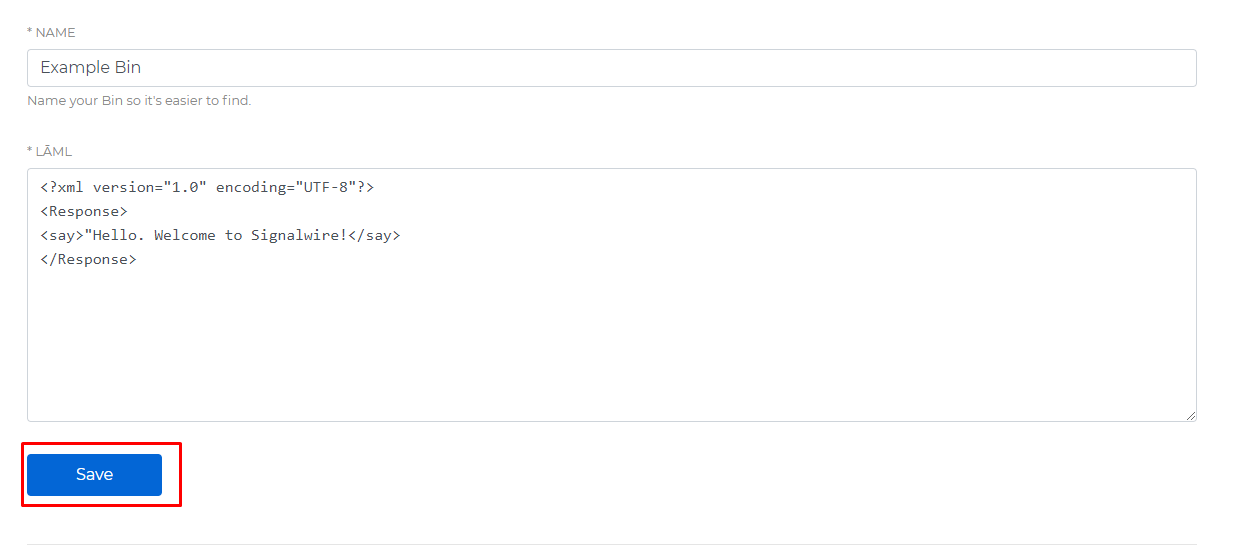
Here we can name our bins, and provide a set of instructions to be executed when the bin is requested.
In this case, our Response to an incoming call would use text-to-speech to say "Hello, Welcome to SignalWire!".

Saving a Bin
Once we have inserted our LaML instructions, we can Save the bin, and we will be redirected to the previous page.
Now our newly created bin will be listed with the information discussed previously.
The most important column for us is the Request URL, which is the URL of the endpoint for that bin.
This endpoint will allow us to point our SignalWire phone number to a bin.
Click the icon next to this URL to copy it to your clipboard.

Using our New Bin
Now that we have created a bin, we need a phone number that will point to our bin. If you need to purchase a phone number, we have an awesome guide to Buying a Phone Number.
Once you have done that, we can navigate back to our Phone Numbers tab in the Dashboard.

Here we will find a list of phone numbers we own, as well as our Verified numbers and a few other tabs.
Each phone number listed will have the following attributes:
Name: Afriendlynameattribute that can be changed to help keep track of your numbers.Number: The actual phone number.Capabilities: The abilities assigned to the number. By default, most numbers are capable of Calling, SMS, MMS, and Fax.
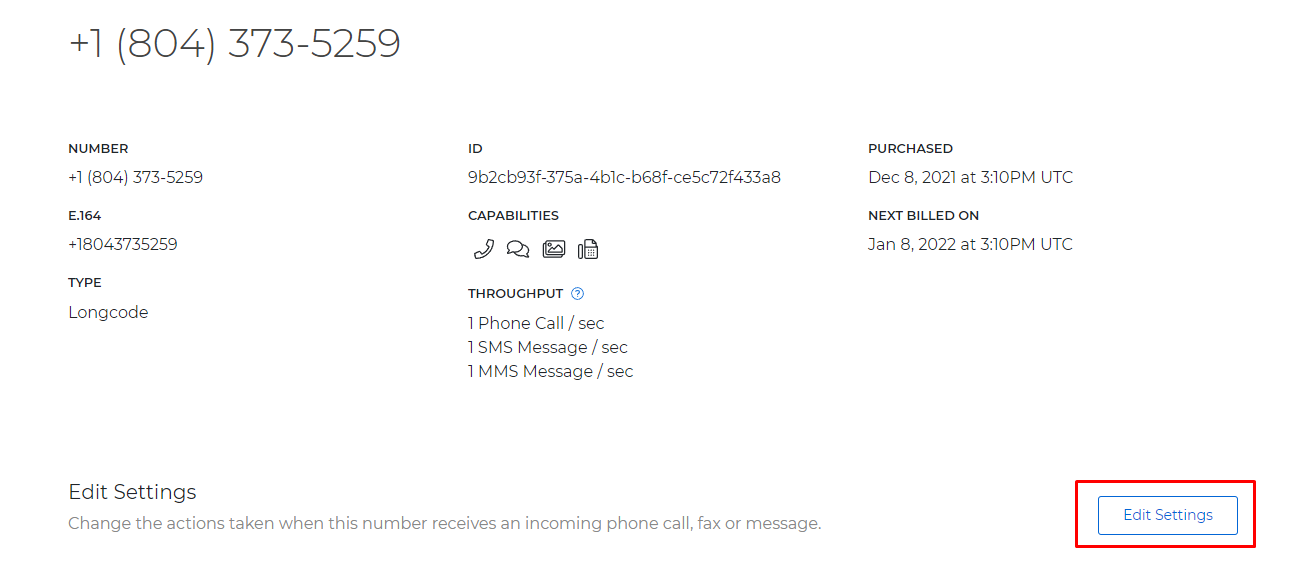
Clicking on the 'Name' of the phone number will allow us to view more information about the number.
Here we can view the Type of phone number, the ID, Throughput, and the Next Billed On date.
Our goal is to point this phone number to the cXML application we have created, and do to that we will navigate to Edit Settings.

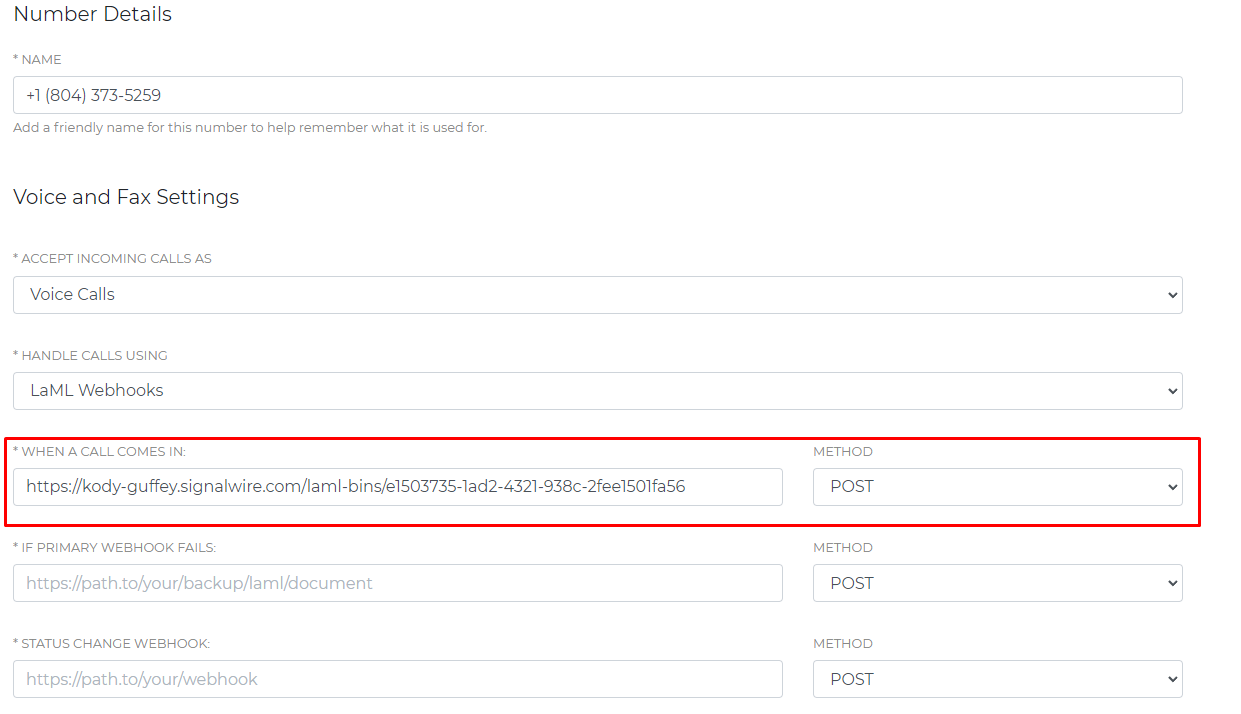
Once we are here we can set a 'friendly name' for our number.
Under Voice and Fax settings, we can set Accept Incoming Calls As to Voice Calls.
Next we can set our Handle Calls as LaML webhooks.
Finally, we can paste the endpoint URL of our bin into the When Calls Come In text box.

If your phone number handles SMS instead of calls, simply scroll down and follow the same steps in the Message Settings category.

The cXML application we created provides a <Say> response that will not work with SMS.
In this case the LaML bin will simply take the inbound SMS, and mark it as processed.
Wrap Up
This guide has hopefully offered a step-by-step walkthrough for you to create and use your first cXML application! While cXML scripts are not as feature-rich as a hosted web application can be, they are a great starting point and provide powerful server-less implementations for basic call, SMS, and fax handling.
Resources
Now that you understand how to create and use cXML scripts, it is time to try it out!
- Our full XML technical documentation
For some practical examples:
More advanced users may be interested in creating dynamic cXML scripts with Mustache Templating.
Sign Up Here
If you would like to test this example out, create a SignalWire account and Space.
Please feel free to reach out to us on our Community Discord or create a Support ticket if you need guidance!