Polycom Configuration
Configuration File or Web
As long as you did not provisioned your phone via the configuration files you can provision it via the WEB; however, the WEB configuration options are quite limited.
The preferred method is using the configuration files. This has a few advantages:
- All parameters can be set.
- A specific software version is downloaded for all phones.
- Mass provisioning is easy.
- Some options must have this method to work (like "buddies").
Obtain Software and Configuration Files From Polycom
All versions (except the latest one) are available on Polycom's site under the "sip download matrix" at:
http://downloads.polycom.com/voice/voip/sip%5Fsw%5Freleases%5Fmatrix.html
Mixed versions support
Some phones are end of support and need older software package. Polycom has a recommended procedure for this, but I am using a simpler method: Each version has a subdirectory on my tftp server and the DHCP directs the phone to the specific subdirectory.
Split versus combined versions
The split package has smaller application files, one for each model, and it allows for a faster boot.
Files in the downloaded package
The package contains quite a few files. The most important ones are:
- xxx-sip.ld - The phone's image. Each phone has different image.
- bootrom.ld - The bootrom image.
- sip.cfg - default configuration.
- phones1.cfg - default configuration.
- Other files which I do not touch
The default configuration is splitted across sip.cfg and phones1.cfg. If you want to change values do not change this files. Instead, create local-sip.cfg and local-phones1.cfg (see bellow).
Assumptions for the examples
- We describe here two lines phone. For more lines replace 1 & 2 with higher numbers.
- Comments in xml are:
<!-- xxx -->
- In the examples we define 3 buttons on the phone:
- first button - a private line.
- second button - a shared line (SLA, BLA, call it whatever you want).
- Third button - BLF (called "buddy" in Polycom's jargon).
- Our main PBX has a DNS name of pbx-main.org.com and the backup one is pbx-backup.org.com
XML lines can be wrapped at any white-space
Local configuration files
There are a few local configuration files which overides the system's default ones, or are specific for each phone:
- local-sip.cfg and local-phones1.cfg: each parameter specified here overides the values specified in sip.cfg and phone1.cfg
- phone-mac-address.cfg - points to the other files of this phone.
- phone-mac-address-settings.cfg - the phone's specific parameters.
- phone-mac-address-directory.xml - the list of your buddies; these are also BLFs.
Example local-phone1.cfg
Here is our local-phone1.cfg file with explanations (in red).
Fixed header:
<?xml version="1.0" encoding="UTF-8" standalone="yes"?>
<!-- Example Per-phone Configuration File -->
<!-- $RCSfile: phone1.cfg,v $  $Revision: 1.83.2.2 $ -->
<local-cfg>
  <phone1>
Lines registration. There are two sample registrations. The first one has two options: The first one (commented) is TLS and the un-commented one is non-TLS.Polycom's mandates that the phone registsrs into the main server and does not register to the second one.
<!--  <reg reg.1.server.1.address="pbx-main.org.com" reg.1.server.1.register="1"
  reg.1.server.2.address="pbx-backup.org.com" reg.1.server.2.register="0"
  reg.1.serverFeatureControl.cf="0" reg.1.server.1.transport="TLS" /> -->
  <reg reg.1.server.1.address="pbx-main.org.com" reg.1.server.1.register="1"
       reg.1.server.2.address="pbx-backup.org.com" reg.1.server.2.register="0"
       reg.1.serverFeatureControl.cf="0" />
   <reg reg.2.server.1.address="pbx-main.org.com" reg.2.server.1.register="1"
        reg.2.server.2.address="pbx-main.org.com"  reg.2.server.2.register="0"
        reg.2.serverFeatureControl.cf="0" />
Important: In order for presence to work correctly, you must set the domain name in vars.xml to the same name used above as the server's name.
Here we tell the phone to track missed calls only on the first line and ignore it for all other lines:
<call>
         <missedCallTracking call.missedCallTracking.1.enabled="1"
call.missedCallTracking.2.enabled="0" all.missedCallTracking.3.enabled="0"
call.missedCallTracking.4.enabled="0" call.missedCallTracking.5.enabled="0"
call.missedCallTracking.6.enabled="0"/>
     </call>
This is needed only if you want to use TLS. Generate your CA certificate, remove all the headers and trailers, concatanate to one line and place it here. Note: The certificate is broken here into multiple lines. it must be in one long string.
     <device>
      <device.sec.SSL.certList.set="1" device.sec.SSL.certList="custom"
device.sec.SSL.customCert.set="1" device.sec.SSL.customCert="MIICwjCCAiugAwIBAgIJAPySJML
4bCDWMA0GCSqGSIb3DQEBBQUAMEsxHDAaBgNVBAMTE0hVSkkgc3dpdxxxxxxxxxxxx0ExKzApBgNVBAo
TIlRoZSBIZWJyZXcgVW5pdmVyc2l0eSBvZiBKZXJ1c2FsZW0wHhcNMTAwMTA3MTQ1MDE0WhcNMTEwMTA
3MTQ1MDE0WjBLMRwwGgYDVQQDExNIVUpJIHN3aXRjaGJvYXJkIEyyyyyyyyYDVQQKEyJUaGUgSGVicmV
3IFVuaXZlcnNpdHkgb2YgSmVydXNhbGVtMIGfMA0GCSqGSIb3DQEBAQUAA4GNADCBiQKBgQDgP7sKmsD
V10DX+om2eAusL3+LS0cB8ykFQ0ZLtdLUvzDCHFHr9lLDSkC6JKFRts80vszzzzzztyoELrV97Mn79nY
F97j1Dh3nJ4kpjsFU/m8DLXN+S+f+FGD2BpsnjWEzcjF7s78JGpQUMsFz/5RwLSjxK3nraSuYaBslTWG
4cwIDAQABo4GtMIGqMAwGA1UdEwQFMAMBAf8wHQYDVR0OBBYEFKfMzdrrfWRASdl9UK5fH5GrsGoPMHs
GA1UdIwR0MHKAFKfMzdrrfWRASdl9UK5fH5GrsGoPoU+kTTBLMRwwGgYDVQQDExNIVUpJIHN3aXRjaGJ
vYXJkIENBMSswKQYDVQQKEyJUaGUgSGVicmV3IFVuaXZlcnNpdHkgb2YgSmVydXNhbGVtggkA/JIkwvh
sINYwDQYJKoZIhvcNAQEFBQADgYEAw2mFHYY778XaS7IR0SOhC+T/mSXE8/LFLqPlVPyZvcF2DpwaK/2
1mtcPFSnEugPPMLAbMsJK9lWwUIVxCxZBBR21pp2ooabUBGtCkhUSkqqZucpGy92wAzsIoqY8aqvSsQM
npMATZGE26kNy/FqhZCTvkXr6sQTuwN1CvZS1R7E=" />
     </device>


</phone1>
</local-cfg>
For version 4: The syntax has been slightly changed. Replace the "device.sec.ssl" line with the following one:
   <device.sec.TLS device.sec.TLS.certList="custom"
    device.sec.TLS.customCaCert1.set="1"device.sec.TLS.customCaCert1="...
Example local-sip.cfg
Here is our local-sip.cfg file with explanations (in red).
Fixed header:
<?xml version="1.0" encoding="UTF=8" standalone="yes"?>

<localcfg>
  <SIP>
list of the servers to register with. A server for each registration
<server voIpProt.server.1.address="pbx-main.org.com"/>
<server voIpProt.server.2.address="pbx-main.org.com" />
User's setting of volume is persistent across calls (default is to reset aftr each call)
  <voice>
        <volume voice.volume.persist.handset="1"
                voice.volume.persist.headset="1" voice.volume.persist.handsfree="1"/>
        <gains voice.gain.tx.analog.handset="12" voice.gain.tx.digital.handset=" />
  </voice>
Enable accoustic echo chanceller:
  <AEC voice.aec.hs.enable="1" />
  <AES voice.aes.hs.enable="1" />
  </SIP>
set your dialplan. Our is:
- 2 followed by 4 digits
- 8 followed by 4 digits
- 02, 03, 04, 08, 09 followed by 7 digits.
- The rest is homeworks...
  <dialplan>
  <dialplan.impossibleMatchHandling="2" dialplan.removeEndOfDial="1">
      <digitmap dialplan.digitmap="8xxxx|2xxxx|6xxxx|0[23489]xxxxxxx|0[57]xxxxxxxx|1[78]00xxxxxx|*8|*xxxx|1[069]x|1234|00x.T" dialplan.digitmap.timeOut="3"/>
   </dialplan>
Send DTMF via rfc-2833
   <tones>
      <DTMF tone.dtmf.level="-9" tone.dtmf.onTime="50" tone.dtmf.offTime="50"
            tone.dtmf.chassis.masking="0" tone.dtmf.stim.pac.offHookOnly="0"
            tone.dtmf.viaRtp="1" tone.dtmf.rfc2833Control="1" tone.dtmf.rfc2833Payload="101"/>
   </tones>
Various user's preferences.
   <user_preferences up.headsetMode="0" up.useDirectoryNames="0"
         up.oneTouchVoiceMail="1" up.welcomeSoundEnabled="1" up.welcomeSoundOnWarmBootEnabled="1"
         up.localClockEnabled="1" up.backlight.onIntensity="" up.backlight.idleIntensity=""/>
NTP server. Set it according to your NTP and daylight saving times.
      <SNTP tcpIpApp.sntp.resyncPeriod="86400"
            tcpIpApp.sntp.address="128.139.4.3" tcpIpApp.sntp.address.overrideDHCP="0"
            tcpIpApp.sntp.gmtOffset="7200" tcpIpApp.sntp.gmtOffset.overrideDHCP="0"
            tcpIpApp.sntp.daylightSavings.enable="1" tcpIpApp.sntp.daylightSavings.fixedDayEnable="1"
            tcpIpApp.sntp.daylightSavings.start.month="3" tcpIpApp.sntp.daylightSavings.start.date="28"
            tcpIpApp.sntp.daylightSavings.start.time="2" tcpIpApp.sntp.daylightSavings.start.dayOfWeek="1"
            tcpIpApp.sntp.daylightSavings.start.dayOfWeek.lastInMonth="0"
            tcpIpApp.sntp.daylightSavings.stop.month="9" tcpIpApp.sntp.daylightSavings.stop.date="23"
            tcpIpApp.sntp.daylightSavings.stop.time="2" tcpIpApp.sntp.daylightSavings.stop.dayOfWeek="0"
            tcpIpApp.sntp.daylightSavings.stop.dayOfWeek.lastInMonth="0"/>
Enable some features on the phone and disable others. for example, enable presence and disable URL dialling.
   <feature feature.1.name="presence" feature.1.enabled="1"
            feature.2.name="messaging" feature.2.enabled="1"
            feature.3.name="directory" feature.3.enabled="1"
            feature.4.name="calllist" feature.4.enabled="1"
            feature.5.name="ring-download" feature.5.enabled="1"
            feature.6.name="calllist-received" feature.6.enabled="1"
            feature.7.name="calllist-placed" feature.7.enabled="1"
            feature.8.name="calllist-missed" feature.8.enabled="1"
            feature.9.name="url-dialing" feature.9.enabled="0"
            feature.10.name="call-park" feature.10.enabled="0"
            feature.11.name="group-call-pickup" feature.11.enabled="0" />
How to handle voicemail messages. When the "messages" button is pressed - call 80666
 <msg>
    <mwi msg.mwi.1.callBackMode="contact" msg.mwi.1.callBack="80666"/>
    <mwi msg.mwi.2.callBackMode="disabled"/>
    <mwi msg.mwi.3.callBackMode="disabled"/>
  </msg>
Set the administrator password of the phone.
  <device  device.set="1" device.auth.localAdminPassword.set="1"
           device.auth.localAdminPassword="AdminPasssword" />
If you want SRTP then add the code bellow. Note that on some phones (like 501) conference is disabled once SRTP is enabled.
  <security sec.tagSerialNo="0">
      <SRTP sec.srtp.enable="1" sec.srtp.leg.enable="1" sec.srtp.offer="1"
            sec.srtp.require="0" sec.srtp.offer.HMAC_SHA1_80="1"
            sec.srtp.offer.HMAC_SHA1_32="0" />
  </security>

</localcfg>
Note that sec.srtp.offer.HMAC_SHA1_32 is disabled. If not, you might have problems with one way audio during directed call pikcup (intercept application).
Example phone specific files
Each phone has three specific configuration files which are named accoring to its MAC address. For example, if we say mac.cfg, and the mac address is 000411223344 then the file name is: 000411223344.cfg
MAC-phone.cfg
I've found this to be the simplest method for provisioning a Polycom. For this method, you will not need to modify any default configuration files because this file will contain the entire phone's configuration. For this example, we will use 000411223344 as our phone's MAC address. By default the phone will look for a file called 000411223344-phone.cfg
In this file, we can override ALL of the previously loaded variables. This was tested on firmware 4.0.3 but I've also tested it on 3.X firmwares and should work fine.
Register one SIP User Agent
Here we have some basic configurations. We set the NTP server, time to EST, enable presence, set voicemail call back to *1, and fill in the authentication credentials needed.
000411223344-phone.cfg:
<?xml version="1.0" encoding="UTF-8" standalone="yes"?>
<PHONE_CONFIG>
  <ALL
    tcpIpApp.sntp.address="us.pool.ntp.org"
    tcpIpApp.sntp.gmtOffset="-18000"
    voIpProt.server.1.address="10.10.10.11"
    voIpProt.server.1.expires="600"
    dialplan.digitmap="**xx.T|*xx.T|[9]11|0T|011xxx.T|xxxxxT|xxxxT|xxxT|xxT|1xxxxxxxxxxT|xxxxxxxxxxT|xxxxxxxT"
    dialplan.digitmap.timeOut="3|3|3|3|3|4|4|5|5|5|5|5"
    feature.presence.enabled="1"
    feature.urlDialing.enabled="0"
    pres.idleSoftkeys="0"
    msg.mwi.1.callBack="*1"
    msg.mwi.1.callBackMode="contact"
    reg.1.displayName="Ext. 1000"
    reg.1.label="Ext. 1000"
    reg.1.address="1000@fs.domain.local"
    reg.1.type="private"
    reg.1.auth.userId="1000"
    reg.1.auth.password="1234"
    reg.1.bargeInEnabled="1"
  />
</PHONE_CONFIG>
Register one SIP User Agent using TCP
Here we have some basic configurations. We set the NTP server, time to EST, enable presence, set voicemail call back to *1, and fill in the authentication credentials needed. nat.keepalive.interval needs to be set for TCP to work.
000411223344-phone.cfg:
<?xml version="1.0" encoding="UTF-8" standalone="yes"?>
<PHONE_CONFIG>
  <ALL
    tcpIpApp.sntp.address="us.pool.ntp.org"
    tcpIpApp.sntp.gmtOffset="-18000"
    voIpProt.server.1.address="10.10.10.11"
    voIpProt.server.1.transport="TCPOnly"
    voIpProt.server.1.expires="600"
    dialplan.digitmap="**xx.T|*xx.T|[9]11|0T|011xxx.T|xxxxxT|xxxxT|xxxT|xxT|1xxxxxxxxxxT|xxxxxxxxxxT|xxxxxxxT"
    dialplan.digitmap.timeOut="3|3|3|3|3|4|4|5|5|5|5|5"
    feature.presence.enabled="1"
    feature.urlDialing.enabled="0"
    pres.idleSoftkeys="0"
    nat.keepalive.interval="60"
    msg.mwi.1.callBack="*1"
    msg.mwi.1.callBackMode="contact"
    reg.1.displayName="Ext. 1000"
    reg.1.label="Ext. 1000"
    reg.1.address="1000@fs.domain.local"
    reg.1.type="private"
    reg.1.auth.userId="1000"
    reg.1.auth.password="1234"
    reg.1.bargeInEnabled="1"
  />
</PHONE_CONFIG>
Register two SIP User Agents, one using Shared Line Appearance (SLA)
Here we do the same as above plus some addition configuration. We have two lines, extension 1000 which is Line 1 (private) and extension 2000 which is Line 2 (shared for SLA).
000411223344-phone.cfg:
<?xml version="1.0" encoding="UTF-8" standalone="yes"?>
<PHONE_CONFIG>
  <ALL
    tcpIpApp.sntp.address="us.pool.ntp.org"
    tcpIpApp.sntp.gmtOffset="-18000"
    voIpProt.server.1.address="10.10.10.11"
    voIpProt.server.1.expires="600"
    dialplan.digitmap="**xx.T|*xx.T|[9]11|0T|011xxx.T|xxxxxT|xxxxT|xxxT|xxT|1xxxxxxxxxxT|xxxxxxxxxxT|xxxxxxxT"
    dialplan.digitmap.timeOut="3|3|3|3|3|4|4|5|5|5|5|5"
    feature.presence.enabled="1"
    feature.urlDialing.enabled="0"
    pres.idleSoftkeys="0"
    msg.mwi.1.callBack="*1"
    msg.mwi.1.callBackMode="contact"
    reg.1.displayName="Ext. 1000"
    reg.1.label="Ext. 1000"
    reg.1.address="1000@fs.domain.local"
    reg.1.type="private"
    reg.1.auth.userId="1000"
    reg.1.auth.password="1234"
    reg.1.bargeInEnabled="1"
    msg.mwi.2.callBack="*1"
    msg.mwi.2.callBackMode="contact"
    reg.2.displayName="Ext. 2000"
    reg.2.label="Ext. 2000"
    reg.2.address="2000@fs.domain.local"
    reg.2.type="shared"
    reg.2.auth.userId="2000"
    reg.2.auth.password="1234"
    reg.2.bargeInEnabled="1"
  />
</PHONE_CONFIG>
MAC.cfg
Contains pointers to other files. The order of files listed in it *is* important, as parameters in previous files override the parameters in later files.
For the example we will use 000411223344 as the MAC address.
000411223344.cfg
<?xml version="1.0" standalone="yes"?>
<APPLICATION APP_FILE_PATH="sip.ld" CONFIG_FILES="000411223344-settings.cfg,
 local-sip.cfg, local-phone1.cfg, phone1.cfg, sip.cfg"
 MISC_FILES="huji-polycom-501.bmp" LOG_FILE_DIRECTORY=""/>
MAC-settings.cfg
This file contains the specific phone's registration parameters: the username, passwords, and the rest. In this example the first line is a private line, the second one is shared one. On shared lines, the thirdPartyName must be the same as the registration name (see a comment under "shared lines" section).
000411223344-settings.cfg
<?xml version="1.0" encoding="UTF-8" standalone="yes"?>
  <reginfo>
    <reg reg.1.displayName="80000" reg.1.address="80000" reg.1.label="80000"
         reg.1.type="private" reg.1.auth.userId="80000"
         reg.1.auth.password="Password" />
    <reg reg.2.displayName="80001" reg.2.address="80001" reg.2.label="80001"
         reg.2.type="shared" reg.2.auth.userId="80001"
         reg.2.auth.password="Password" reg.2.thirdPartyName="80001" />
</reginfo>
MAC-directory.xml
This file holds the "buddies". The first buddies are displayed on available line buttons (if any) while the rest are shown when pressing the "buddies" button.
first contact we watch is 80000 and the second one is 80001. Parameter sd should be incremented. bw (buddy watch) must be 1 in order to have BLF functionality.
000411223344-directory.xml
<?xml version="1.0" encoding="UTF-8" standalone="yes"?>
<!-- $Revision: 1.2 $  $Date: 2004/12/21 18:28:05 $ -->
<directory>
        <item_list>
                <item>
                        <ln>Last-name</ln>
                        <fn>first-Name</fn>
                        <ct>80000</ct>
                        <sd>1</sd>
                        <rt>7</rt>
                        <dc/>
                        <ad>0</ad>
                        <ar>0</ar>
                        <bw>1</bw>
                        <bb>0</bb>
                </item>
                <item>
                        <ln>Last-name</ln>
                        <fn>first-Name</fn>
                        <ct>80001</ct>
                        <sd>2</sd>
                        <rt>7</rt>
                        <dc/>
                        <ad>0</ad>
                        <ar>0</ar>
                        <bw>1</bw>
                        <bb>0</bb>
                </item>
        </item_list>
</directory>
Note: Polycom's BLF is actually "presence", which means that as BLF it displays only "free" or "in call" status.
Enhanced presence
On phones with productivity suite the enhanced presence feature can be set. It allows for a BLF to be in one of three states: idle, ringing, busy; it allows call pickup while the line is in the ringing phase. It can be used instead of the buddies lists. It should be defined in the phone's specific file. Please see Polycom Presence Setup for more details.
Shared lines
Shared lines (known as SLA) are extensions which appear on more than one phone and show the status of the extension on the other phones. When you pick up the handset on one phone the others show that this line is seized. When you put it on hold all others see it is on hold and can pick up the call. This is very useful for all those who are accustomed to conventional "key systems".
FreeSWITCH emulates the Broadsoft method. Use the regular settings on FreeSWITCH and do not set thirdPartyName on Polycom's config files.
Sylantro support has been removed. It was incomplete anyway, and FreeSWITCH fully supports the Broadsoft SCA shared line spec.
A few declarations in FreeSWITCH configuration files are essential for proper operation of this:
- You have to set manage-presence to true on one profile and passive on the others.
- dbname is the same for all profiles; the default is "shared_presence" so you will see this name in the db directory.
- manage-shared-appearnce is true for all participating profiles.
- most important: set presence-hosts in the profiles to exactly the same name you specified as registrar in Polycom's config files (reg.x.server.y.address). It can be either DNS name or IP address.
DHCP setup
The phone gets its configuration server via option 66. Here is a sample DHCP config file which boots the first phone via TFTP from the TFTP's root, while the second one needs newer firmware and thus its files are located under a subdirectory.
Let's assume that the boot server is 1.1.1.1 and the phones are on 2.2.2.x network:
# option definitions common to all supported networks...
option domain-name "org.com";
option domain-name-servers 1.1.1.1;

default-lease-time 3600;
max-lease-time 7200;

# If this DHCP server is the official DHCP server for the local
# network, the authoritative directive should be uncommented.
authoritative;

# Use this to send dhcp log messages to a different log file (you also
# have to hack syslog.conf to complete the redirection).
log-facility local6;

# Define custom options
option option-66 code 66 = string;

# The phone's subnet
subnet 2.2.2.0 netmask 255.255.255.0 {
  default-lease-time 3600;
  max-lease-time 7200;
  option routers 2.2.2.1;
  option ntp-servers 1.1.1.1;
}

host phone-OLD {
        default-lease-time 600000;
        hardware ethernet 00:04:11:22:33:44;
        fixed-address 2.2.2.10;
        option option-66 "tftp://1.1.1.1/";
}

host phone-NEW {
        default-lease-time 600000;
        hardware ethernet 00:04:11:22:33:55;
        fixed-address 2.2.2.20;
        option option-66 "tftp://1.1.1.1/POLYCOM_NEW";
}
Language support
Polycom allows you to add more language supports for display (i.e. you can tailor the labels, but cannot have special input methods). Described bellow is how to add Hebrew labels to the phone. Since Polycom excluded the Hebrew address range inside UTF-8 (maybe they plan on doing it themselves?) we had to take a different free space in the code table.
Software required
- FontForge
- SoundPoint IP phone configuration
- A Linux installation with X11, to extract the Hebrew (ISO8859-8) GPL fonts
- tftp service running in Linux
Documentation required
- Administrator’s Guide for the Polycom® SoundPoint® IP/SoundStation® IP/ VVX™ Family
- Section “Multilingual User Interface" (4-29)
- Section “Multilingual <ml/>" (A-28)
- Section “Fonts <font/>" (A-91)
Fonts
Images will be added later
-
Install FontForge
-
Run the following command to find the Hebrew fonts available in your X11 installation:
- locate 8859-8 | grep pcf
-
Copy and decompress the files somewhere (I did it in /tftpboot/fnt), in order to edit them.
-
Open FontForge, select a font size according to the phone model display you need (501 → size 10, 550 → size 19) and follow the images:

-
-
After the font is opened, you'll see the Hebrew letters are placed almost at the end of the indexed table.
-
In order for the fonts to work, the “aleph" letter must be placed at the number index 208, and the rest of the letters in the consecutive numbers.
-
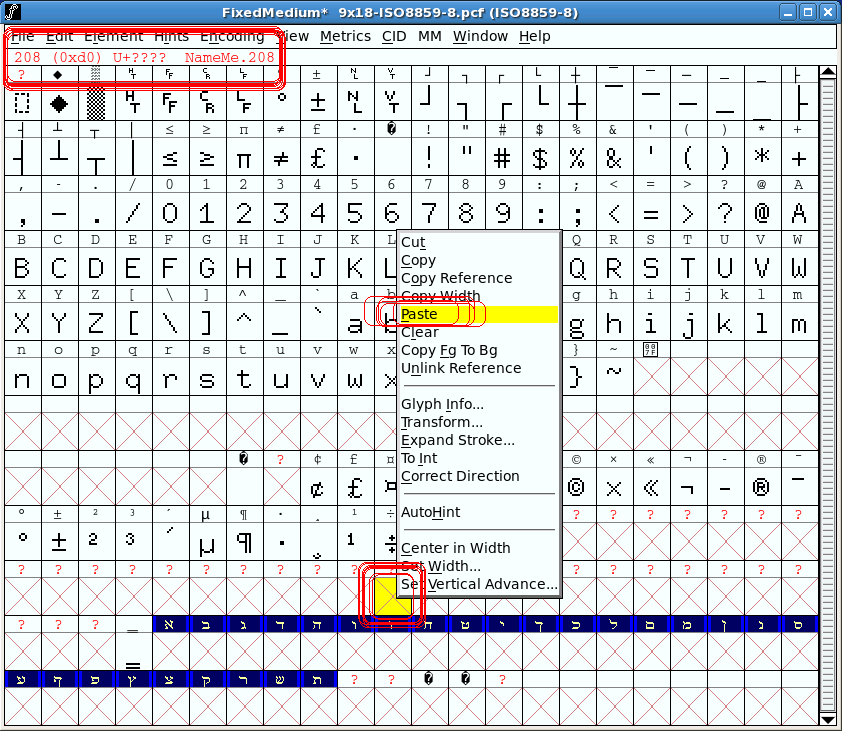
To do this you must select all the Hebrew letters, and “cut" them, so we can paste them in the right place, as shown below.
-
Look for the square, whose index (on the upper left) is 208.
-
Right click on it and “paste" the letters.
-
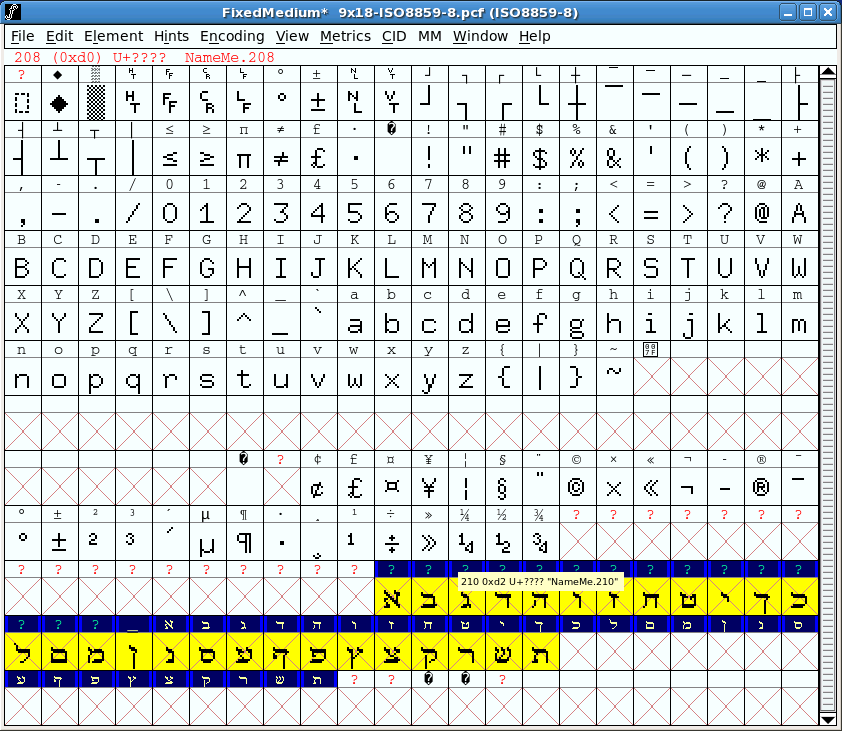
- The new letters are now in the correct index position, as shown here
-
-
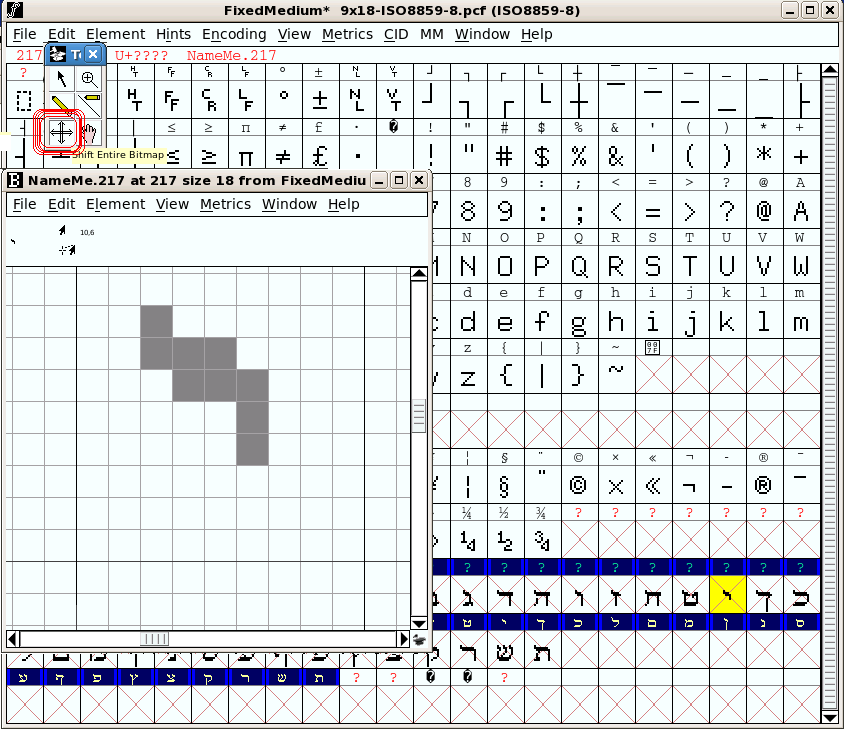
Now we are ready to change the letters from “fixed width" to “variable width".
-
You must double click on each letter, and make the steps I'll show here with the letter “yod".
-
Open the letter, and click on the marked tool, called “Shift Entire Bitmap"
-
-
-
With it, we'll move the bitmap (only horizontally) to the left, so we leave only one square to the its left (see next pic).
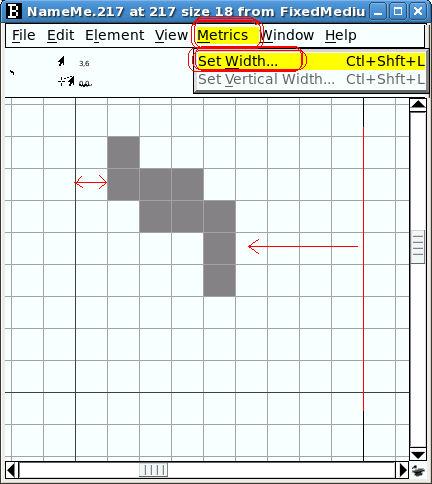
-
Now that the bitmap was placed to 1 square of distance from the left black margin line, we would like to move the right margin marked in red) to fit the letter's width.
-
-
- We do so by selecting “Metric" → “Set Width...".
- Count the number of squares, and write the new width in the window.
- After you press “OK", the new width will be set. When you finish all the letters, the font will be of “variable width".
[[File:Polycom_hebrew_scr7.png] <---- ??? Same on original wiki
-
- We are ready to generate the new font.
- Go to “File" → “Generate Fonts..."
- Save the new font under your TFTP root. Pay attention to give the name, as specified in section “Fonts <font/>" (A-91).
- Be sure the format is “Win FNT".
- The font's size is shown, and will be appended to the end of the name, so you must rename the font after you save it.
- After you press “Save", accept the “Guess" option on the “BDF Resolution" dialogue.
- We are ready to generate the new font.
Dictionary file
- Download the configuration files for your Polycom model, and put them in your tftp directory.
- To create the Hebrew dictionary file, copy the English dictionary folder (stored by default in tftpboot/SoundPointIPLocalization/English_United_States) to /tftpboot/SoundPointIPLocalization/Hebrew_Israel.
- Edit the file /tftpboot/SoundPointIPLocalization/Hebrew_Israel/SoundPointIP-dictionary.xml, and translate the words into Hebrew, editing the file in UTF-8 and writing the words using “visual representation".
- To add the Hebrew dictionary you created, you'll need to append a new dictionary item inside “sip.cfg", under the following tag:
<menu lcl.ml.lang.menu.1="Chinese_China" lcl.ml.lang.menu.2="Danish_Denmark"
[...]
lcl.ml.lang.menu.18="Swedish_Sweden"
lcl.ml.lang.menu.19="Hebrew_Israel" />
- To modify the way the clock and date are shown in the phone's display, you need to modify the tag shown below in your “sip.cfg":
<clock lcl.ml.lang.clock.1.24HourClock="1"
lcl.ml.lang.clock.1.format="D,dM" lcl.ml.lang.clock.1.longFormat="1"
lcl.ml.lang.clock.1.dateTop="1" lcl.ml.lang.clock.2.24HourClock="1"
lcl.ml.lang.clock.2.format="D,dM" lcl.ml.lang.clock.2.longFormat="1"
lcl.ml.lang.clock.2.dateTop="1"
[...]
lcl.ml.lang.clock.18.24HourClock="1" lcl.ml.lang.clock.18.format="D,dM"
lcl.ml.lang.clock.18.longFormat="1" lcl.ml.lang.clock.18.dateTop="1"
lcl.ml.lang.clock.19.24HourClock="1" lcl.ml.lang.clock.19.format="Md,D"
lcl.ml.lang.clock.19.longFormat="1" lcl.ml.lang.clock.19.dateTop="1"/>
For more information on the format, take a look at section “Multilingual <ml/>" (A-28).
- The languages available in each phone model are defined inside “sip.cfg, under the next tag. Make sure the number for Hebrew_Israel (in this example “19") appears in the list, or that the keyword “All" is used.
<list lcl.ml.lang.IP_500.list="2,3,4,5,6,7,8,9,12,13,14,15,16,17,18,19"
lcl.ml.lang.IP_600.list="All"
lcl.ml.lang.IP_4000.list="2,3,4,5,6,7,8,9,12,13,14,15,17,18"/>
In the example above, models compatible with 500 and 600 will get the option of Hebrew dictionary, but not the model 4000.
- To make the new Hebrew dictionary the default in your phone, modify “sip.cfg" so the tag matches the following line:
<language lcl.ml.lang="Hebrew_Israel">
- To upload the Hebrew fonts to your phone, search for the following tag/tags inside “sip.cfg", and modify them to insert the fonts name:
<IP_500 font.IP_500.1.name="fntHeIP501_10_U0500_U05FF.fnt"/>
<IP_600 font.IP_600.1.name="fntHeIP550_19_U0500_U05FF.fnt"/>
- After you make these changes, you can restart the phone, to load the changes.
Troubleshooting
Problems in the display (like seeing squares instead of the letters) are usually related to:
- A wrong font size: to solve this, check you are using the right font height size. You can count the pixels in the display for a normal letter in English, to get an idea of the possible height value. Also checking on the internet may help, but there's not much info out there.
- The font wasn't loaded correctly: check with your tftp log that the font was downloaded successfully to the phone, and make any correction if needed.
Contact us
If you find something wrong here please contact me at Yehavi.Bourvine@gmail.com
Pending issues with Polycom
The following issues have opened tickets with Polycom's support:
- Dial tone on a shared line: Suppose you have an SLA extension defined on more than one phone. You answer on one phone, put it on hold, go to the other phone and press the blinking line in order to have the call there. If you press this line and within 1 second pull the handset - you hear a dialtone at the background of the session. If you wait more than 1 second or first pull the handset (and then press the line button) - all is ok. Fixed in 3.3.0 and up/
- Dial using the second line: If you have a phone with more than one extension defined on it, it will will use the first line for outgoing calls by default (unless ofcourse you select a specific line). However, there is one special case: you dial on-hook and then press the speaker button:
- The call is initiated on the first line.
- Immediately after getting "Trying" the phone sends CANCEL.
- The phone originates the call successfully over the second line.
Fixed in version 3.3.1
See also
Attachments:
![]() 691px-Polycom_hebrew_scr2.png (image/png)
691px-Polycom_hebrew_scr2.png (image/png)
![]() Polycom_hebrew_scr2.png (image/png)
Polycom_hebrew_scr2.png (image/png)
![]() Polycom_hebrew_scr3.png (image/png)
Polycom_hebrew_scr3.png (image/png)
![]() Polycom_hebrew_scr2.png (image/png)
Polycom_hebrew_scr2.png (image/png)
![]() Polycom_hebrew_scr3.png (image/png)
Polycom_hebrew_scr3.png (image/png)
![]() Polycom_hebrew_scr2.png (image/png)
Polycom_hebrew_scr2.png (image/png)
![]() Polycom_hebrew_scr4.png (image/png)
Polycom_hebrew_scr4.png (image/png)
![]() Polycom_hebrew_scr3.png (image/png)
Polycom_hebrew_scr3.png (image/png)
![]() Polycom_hebrew_scr4.png (image/png)
Polycom_hebrew_scr4.png (image/png)
![]() Polycom_hebrew_scr6.png (image/png)
Polycom_hebrew_scr6.png (image/png)
![]() Polycom_hebrew_scr7.png (image/png)
Polycom_hebrew_scr7.png (image/png)