Make outbound LiveKit Agent calls via SignalWire
This guide will help you set up outbound SIP calls using LiveKit and SignalWire. Follow these steps to configure your SIP domain, SWML script, and LiveKit settings efficiently.
Prerequisites
Before getting started, you'll need the following:
Setup
Create a SWML Script
- New Dashboard
- Legacy Dashboard
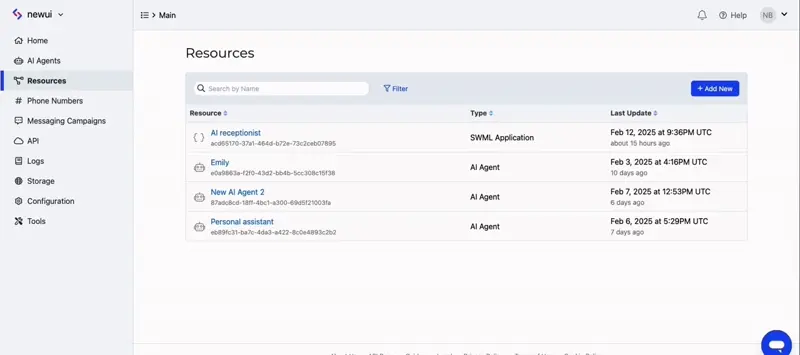
To create a SWML Script in the new UI, go to the Resources section from the sidebar, and create a new Resource. In the new resource picker, select Script and create a SWML Application.
If you are using the Legacy UI, go to the "Relay/SWML" section in your sidebar, then click on the SWML Scripts tab. Click on Create a SWML Script, and then give it a name and pass it some instructions. You can use the following as a starting point:
- Log in to your SignalWire Dashboard and navigate to the Resources tab on the left-hand sidebar.
- Click Add, select Script, and then choose SWML Script.
- Paste the following SWML code snippet into the editor:
version: 1.0.0
sections:
  main:
    - connect:
        answer_on_bridge: true
        from: "+1XXXXXXXXXX"
        to: "%{call.to.replace(/^sip:/i, '').replace(/@.*/, '')}"
Be sure to replace "+1XXXXXXXXXX" with a phone number from your SignalWire account.
Add SIP address
- Save the SWML script and navigate to the Addresses & Phone Numbers section within the script.
- Click Add and select SIP Address to add your SIP domain application.
- Configure this SIP address based on your requirements, and save it.
- After configuration, note down your unique SIP domain.
Example SIP domain: test-space-live-kit.dapp.signalwire.com.
Now, let’s configure LiveKit for outbound SIP calling. Follow along with LiveKit’s documentation for outbound SIP trunk setup.
Create an outbound trunk
Use the following JSON configuration for creating an outbound SIP trunk, ensuring you update the given fields:
{
   "trunk": {
      "name": "My Outbound SIP Trunk",
      "address": "test-space-livekit.dapp.signalwire.com",
      "numbers": ["+15105550100"],
      "auth_username": "<username>",
      "auth_password": "<password>",
      "transport": 3
   }
}
Update placeholders in the above JSON with the following:
| Placeholder | Replace with |
|---|---|
"address" | The SIP domain you created previously (e.g., test-space-live-kit.dapp.signalwire.com). |
numbers | A SignalWire phone number. |
<username> and <password> | The credentials provided by SignalWire Support. Contact Support if needed. |
Submit this request and save the generated Trunk ID.
If you forget to save the Trunk ID, use LiveKit’s CLI tool to retrieve the trunk configurations.
Create SIP participant
To initiate outbound calls through your configured trunk, you'll need to create a SIP participant in LiveKit. This process establishes the connection and manages the call flow. For detailed instructions on creating SIP participants and handling outbound calls, refer to LiveKit's comprehensive guide to Creating a SIP Participant.
If you're working with LiveKit AI agents for outbound calls, please see the LiveKit AI Agent Telephony Guide.
Final checks
- Ensure the trunk address matches exactly with the one created previously.
- Phone numbers must be in E.164 format (e.g., "+15105550100") to ensure proper routing and connectivity.
You’re now ready to make your first outbound SIP call using LiveKit and SignalWire. If you encounter any issues, verify the configurations for both SignalWire and LiveKit.
Next steps
Record calls
Record calls by creating a SWML script with recording logic and slightly modifying your outbound SWML script.
Create a second script
In your new script, paste the following SWML:
version: 1.0.0
sections:
  main:
  - record_call:
      format: mp3
Update the outbound SWML script
Then, modify your existing outbound SWML script by adding the confirm parameter under the connect method,
and setting its value to the URL for the new recording script.
The result should look like this:
version: 1.0.0
sections:
  main:
    - connect:
        answer_on_bridge: true
        confirm: "your-recording-script-url"
        from: "+1XXXXXXXXXX"
        to: "%{call.to.replace(/^sip:/i, '').replace(/@.*/, '')}"
These recordings can be accessed in the Dashboard in Storage > Recordings, or using the Recordings List API endpoint.
View logs
Access call logs in the Logs tab of your SignalWire Dashboard.